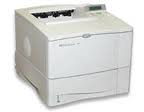
Tray 1 Load Plain Letter – HP Laserjet 4000, 4050, 4100 Printer
Alright this repair has been around quite awhile given these machines are ten years old or more. Customers call and complain that the display on their HP laserjet 4000, 4050, and 4100 printers reads Tray 1 Load Plain Letter and nothing they do can get rid of the message. In this article, I will explain why the printer displays the message, discuss what causes the error, and walk you through fixing the machine.
Troubleshooting the Tray 1 Load Plain Letter in the HP Laserjet 4000, 4050, and 4100 Printer
First thing to do in troubleshooting the tray 1 load plain letter in the HP laserjet 4000, 4050, and 4100 is to print a configuration page to check the paper size settings. Through the menus on the control panel scroll to the information menu press select then scroll to the configuration page and press select. If the display reads Tray 1 Load Plain Letter then load letter size paper in the tray and let it print. If you want you can press the go button without loading tray 1. The machine will ask to print from tray 2 instead. Tell it yes by pressing go again. Once the page feeds out the display will probably read 41.3 Unexpected Paper Size. But that’s ok. in the bottom right column of the configuration page is the paper size settings. Make sure tray 2 is set to plain letter. If a switch or paper stop is not working or out-of-place the paper size will usually read exec. or legal size.
1. Check your print properties in your print driver. Make sure the trays are set to auto. If they are set to manual feed then the machine will display the Tray 1 Load Plain Letter message. Also if through the control panel the manual feed is set to on then it might display the same message.
2. Paper Stop – Pull out the paper tray and remove the paper. The paper stop controls what size paper the machine thinks it has. You will notice if you move the paper stop back or forward white levers on the right side of the paper tray move in and out. The paper stop, as it ages, likes to move back in the machine out of the letter position. If you see the stop is not pushed all the way forward in the tray then it will not read letter size paper, resulting in the tray 1 load plain paper message or paper jam errors. What I like to do when I see this problem is push the stop back exposing the first two holes in the tray that’s suppose to keep the stop from moving back out of the letter position. Take a screwdriver and put it in the holes and push down on the screwdriver towards the front of the paper tray, pushing up the back part of the metal slightly in the holes then pull the stop forward over the holes. Now when you push the stop back instead of just sliding back it catches on the raised metal and doesn’t want to move. If you pull up on the back of the stop it will move back the way it should.
3. The most common failure resulting in the tray 1 load plain letter message is the paper size controller board. The white levers I talked about above in the paper stop section mesh with the paper size board in the back right corner of the machine. The micro switches are famous for going out. I use to carry these in my car stock because I was replacing them all the time. Sometimes just opening and closing the cassette tray will make the problem go away. If the message goes away for a short period of time then comes back then most likely the board will have to be replaced. After checking your control panel, driver, and paper stop and the message will not go away then its time to replace the paper size board. The good thing is the boards are cheap and easy to replace. If you need to replace the board follow the instructions below for replacement to solve your tray 1 load plain paper message.
Paper Size PCA Controller Board Removal For the Tray 1 Load Plain Paper Message
Remove toner cartridge and gently place printer on its right side
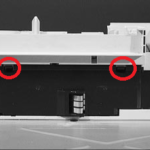
PCA Cover – HP LaserJet 4000, 4050, and 4100
1 Release the latches shown.
2 Remove the PCA Cover.
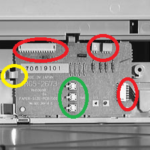
PCA Controller
1 Unplug 4 connectors to the PCA Controller. RED
2 Unclip the left side of the PCA Controller and remove it. YELLOW
Conclusion about the Tray 1 Load Plain Letter Message on the HP Laserjet 4000, 4050, and 4100 Printers
Hopefully this article has helped you resolve the tray 1 load plain letter message in your HP laserjet 4000, 4050, and 4100 printer. Only a few things can cause the issue and the vast majority of them are fixed by replacing the paper size controller board.


Hi there! GREAT website and HP resource!
we have a few HP4050TN,
As these are the 3 tray versions, accessing the feeder control PCA seems like a major deal.
This post addresses only the models with single tray. The optioned models like 4050TN, etc are not so simple.
Can I easily get to the LOWER tray (#3) by simply remove the metal bottom pl;ate?
Can I get to the feeder control PCA of tray #2 (middle) easily or its complete disassembly?
MANY THANKS!
Jon