Xerox Phaser Printer 4500 Error Codes List
Alright, if your into lots of technical information and tons of diagnostic information, buy yourself a service manual for this machine and have at it. Some service manuals have very little information for diagnosing problems. This manual goes on forever and can take the simplest of problems and make them ten times more complicated. In my experience, you might want to try a little common sense troubleshooting before breaking out the service manual on these machines. Below I’ve provided a list of the 4500 Error Codes along with some suggestions for the codes. Some of them more than others but I give the basics. The service manual provides a lot more detailed information if needed or call a service provider if your unsure how to proceed. Look below the list for a diagram of sensor locations.
Xerox Phaser Printer 4500 Error Codes Explained
Engine Logic Board NVRAM Failure – Turn the machine off and on. Turn the machine off, wait 10 to 15 minutes then try again. Check power source. Plug straight into wall outlet. Replace HVPS/Engine Logic Board.
Main Motor Failure – Remove cartridge and turn the machine off then back on. Listen for motor rotation. Cartridges cause most motor failures. Check for other debris or broken gears. Replace motor or find local service provider
Laser Unit Failure – Turn off then back on. Replace laser scanner unit or find local service provider for further diagnostics.
– Laser Fails at warm-up
– Laser Fails Motor Speed
– LD Power is High
– LD Power is low
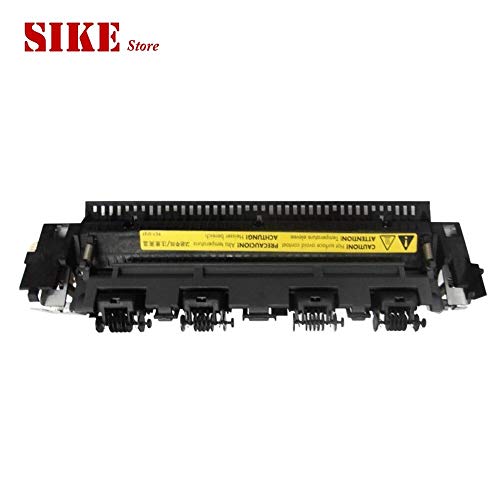
Fuser Failure – Turn power off then back on. Check and make sure plugged straight into wall outlet. Check thermistors, check lamp continuity and thermostat. Replace if needed.
– Fuser High Temp
– Fuser Low Temp
– Fuser Overheat in Stand-by
– Fuser Fails at warm-up
– Fuser Thermistor Failure
Toner is Low – Replace Toner
Fan Failure – Check fan for proper rotation. Sometimes the fans will rotate but not at proper speeds. Clean fan of debris and try again. Replace if needed or consult service provider for further diagnostics.
Install or Reseat print cartridge – Replace the toner cartridge
Replace Print Cartridge – Replace the toner cartridge
Close Top Cover – Check the sensor and actuator for proper operation, misalignment and or damage.
Close Rear Cover – Check the sensor and actuator for proper operation, misalignment and or damage.
Jam at Tray 1, Jam at Tray 2, Jam at Tray 3, Jam at Tray 4 – Remove Trays and Open Top Cover to Clear – Paper arrives early or late to the registration sensor. Check the paper tray. Verify the tray’s end guide is set to the proper paper size setting. Verify paper path is clean of debris. Check tray for proper operation. Clean and or replace feed pick up rollers. Check the registration sensor. Bits of paper love getting stuck in this area and hide from view. Usually the paper hangs out at and around the sensor flag causing jams right at the flag.
Jam at Top – Open Top Cover to Clear – Paper made it to the registration but failed to make it to the exit roller. Again, paper likes to hang in the registration area. Check sensor flag for proper movement and verify not paper debris is hung up on the flag or in the sensor. If the paper gets up to the fuser remove fuser and check fuser rollers, gears, and exit sensor for wear, broken parts, and proper movement.
Jam at Exit – Open Top Cover to Clear – Remove fuser and check fuser rollers, gears, and exit sensor for wear, broken parts, and proper movement. Check exit rollers for proper rotation. I’ve seen label goo get stuck in this area on machines that use lots of labels cause this error.
Jam at Duplex – Check duplex area and sensor for debris
Jam at Rear – Check rear area sensor and flag for debris. Clear paper path
Jam at Stacker – Remove jam from stacker
Paper Size Jam – Check paper size settings in machine and on the tray. Check registration sensor for proper operation. Try a different tray.
Insert tray 1 – Reinsert tray – Check end guide assembly, sector gear, size rack, ans size switch link
Insert Tray 2 – Reinsert tray – Check end guide assembly, sector gear, size rack, ans size switch link
Insert Tray 3 – Reinsert tray – Check end guide assembly, sector gear, size rack, ans size switch link
Insert Tray 4 – Reinsert tray – Check end guide assembly, sector gear, size rack, ans size switch link
Tray 2 Paper is Low – Remove tray and check for damage. Install more paper. If you have an additional tray, switch and try again. Check sensor flag and sensor for proper operation.
Tray 3 Paper is Low – Remove tray and check for damage. Install more paper. If you have an additional tray, switch and try again. Check sensor flag and sensor for proper operation.
Tray 4 Paper is Low – Remove tray and check for damage. Install more paper. If you have an additional tray, switch and try again. Check sensor flag and sensor for proper operation.
No Paper in Tray 1 – Check the paper tray, load more paper, check the no paper sensor for proper operation.
No Paper in Tray 2 – Check the paper tray, load more paper, check the no paper sensor for proper operation. If you have another 500 sheet tray swap.
No Paper in Tray 3 – Check the paper tray, load more paper, check the no paper sensor for proper operation. If you have another 500 sheet tray swap.
No Paper in Tray 4 – Check the paper tray, load more paper, check the no paper sensor for proper operation. If you have another 500 sheet tray swap.
Maintenance Kit is Near End of Life – Maintenance Kit is near the end of its life. You need to get one on order
Replace Maintenance Kit – Replace kit parts and reset the PM counter
Stacker is Full, Unload Paper – Unload paper, check stacker sensor and actuator for proper operation.
Standard Output Tray is Full, Unload Paper – Unload paper, check Output Tray sensor and actuator for proper operation.
Tray 3 Failure – Reseat. Turn power off then back on. Replace.
Tray 3 or 4 Failure – Reseat. Turn power off then back on. Replace.
Duplex Unit Failure – Reseat. Turn power off then back on. Replace.
Stacker Unit Failure – Reseat. Turn power off then back on. Replace.
Close Duplex Unit – Check sensor and actuator for proper operation.
Close Stacker cover – Check sensor and actuator for proper operation.
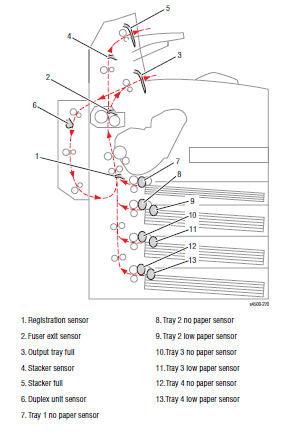
Sensor Locations
I’ve talked about a lot of sensors in the 4500 Error codes listed above. Below you will find the locations of most the sensors.