Illustrated Instructions for Xerox Workcentre 6400 Fuser Replacement
Like most Xerox machines, the Xerox Workcentre 6400 Fuser Replacement and Counter Reset procedure is pretty straight forward. The main reason why I get called out to replace these parts is because the machine is big, it can be intimidating, and it cost a small fortune. All these scenarios lead to people to not want to handle this repair on their own. An easy service call for me, I guess. Anyway, at around 130,000 to 150,000 pages you will get a a reorder fuser message which will lead to a replace fuser message. I’m not sure on this machine but some machines stop working when the life is over and some keep going. The only thing I know is that it typically is not worth the chance. Once you get a warning message it is time to start thinking about getting the part.
Below you will find the replacement procedure along with the counter reset procedure. I would first try to reset the part without going into admin mode. If the menu is not there then log into the admin mode and try again.
Xerox Workcentre 6400 Fuser Replacement Procedure
Warning
The fusing assemblies tend to run over 350 decrees. Therefore it is recommended that you allow at least 20 to 30 minutes to cool before you remove the unit from the machine.
1. Open the Front Door.
2. Lift the Control Panel.
3. Open the Right Door.
4. Loosen the 2 amber gold plastic screws that secure the Fuser Unit.
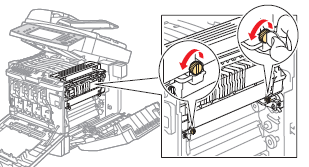
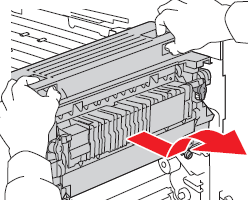
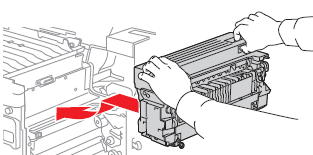
5. Grasp the amber gold Fuser handles, tilt and slide the Fuser Unit out to remove it.
Replacement Note
Be sure to tilt the Fuser Unit at an angle when installing the Fuser Unit.
When replacing some Routine Maintenance Items the printer’s life counter must be reset.
1. Log in as the system administrator. (Depending on how your machine is setup, this feature might be disabled or the password might be changed)
To log in as a system administrator:
1. Press the Log In/Out button on the control panel.
2. Enter the user name admin.
3. Select Next.
4. Enter the default password 1111.
5. Select Enter.
2. On the printer’s control panel, press Machine Status.
3. Select the Tools tab.
4. In the list on the left side of the tab, select Device Settings.
5. In the list on the right side of the tab, select General, then select Supply Counter Reset.
6. Select the Routine Maintenance Item that was replaced from the list.
7. Select Reset.
8. In the pop-up window, select Reset.
9. Select Close.
Click on the links below for up to the date fuser pricing along with buying options.
Xerox 115R00059 ( 110 V ) – fuser kit – for WorkCentre 6400S, 6400X, 6400XF, 6400XM

