Instructions for the Okidata C5500, C5800, C6100 Feed Roller Replacement
All feed rollers will fail at one point or another. Oki service manuals are horrible at given these things ratings. They must figure when you start having feed related problems in the paper cassette tray then you will know it’s probably time to start replacing the feed rollers. These machines have a pick up roller, feed roller, and friction / separation pad. The pick up rollers don’t get as much usage so you only tend to replace the feed roller and separation pad during normal feed roller maintenance. However, if you are running extremely high volumes then you will probably want to replace the pick up roller too. I tend to replace the feed roller and separation pad on machines once they hit around 50,000 to 75,000 prints, the pick up roller probably can make it anywhere between 100,000 and 150,000.


Okidata C5500, C5800, C6100 Feed Roller Replacement Procedure
Note: The paper feed roller and separate piece must be replaced by the set.
1. Turn off the power of the printer and remove the paper cassette.
2. Stretching the claw of the paper feed roller (large) outward, remove the roller from the shaft.

Note : When attaching new paper feed roller, put it in the shaft and make sure that it latches in place. Failure to get it latched in place will lead to feed problems as the roller will eventually slide out of position and quit moving. Sometimes this happens right away and other times it might take some prints. Nothing is worse than getting called back for feed issues just to find you didn’t take the extra second to make sure it was in latched in place.
Okidata C5500, C5800, C6100 Friction Pad Replacement Procedure
1. Remove the spring from the paper cassette.
2. Bend the separate piece until disengaging one leg of it from the support, and lift the piece up to remove it.
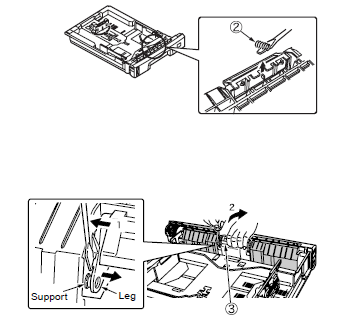
3. Put the support through the hole of one leg of new separate piece and bend the other leg, and then push the piece from above so that the other support is put through the hole of the other leg.
Do not touch the pad (rubber part) at that time.
4. Confirm that the supports are put through the holes of both legs.
5. Put new spring in the post of the separate piece to attach it.
6. Confirm that the separate piece moves smoothly around the support.


This was very helpful. One question, is this the only rollers in the printer?
The maintenance kit for the OKI C5500 has 2 other types of rollers in it.