Instructions for the Okidata B6500 Fuser Replacement Procedure
The service manual for this machine is about one of the worse I’ve ever seen. I don’t know if it is because the machine is so familiar to other models in this line or Oki just didn’t care. Anyway, the life on the fuser is probably between 200,000 and 300,000 prints. These machines are work horses so you won’t have to be replacing this part very often. Most the times I replace these parts is because of age rather than usage. They will wear out over time and develop scratches in the surface of in some cases toner will start to stick to the hot roller as the outer coating starts to deteriorate. Below, find the illustrated instructions for the Okidata B6500 Fuser Replacement Procedure.

Okidata B6500 Fuser Replacement Procedure
Before performing the following procedures, make sure that the fusing assembly has cooled.
1. Open the Rear Cover.
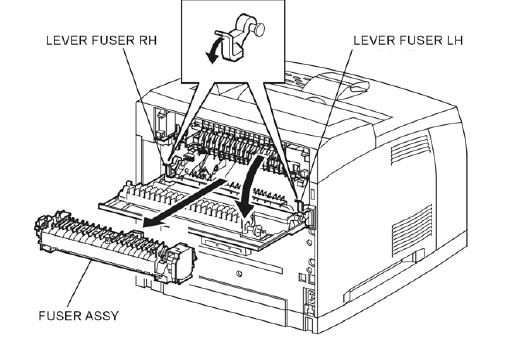
2. Push down the left side lever and right side lever in the direction of the arrow to release the lock of the fusing assembly.
3. Shift the fusing assembly in the direction of the arrow, and remove it from the printer.
Installation Instructions for the Okidata B6500 Fusing Assembly
1. Shift the fusing assembly in the opposite direction of the arrow, and install it to the printer.
2. Lock the fusing assembly by pulling up the left and right lock levers.
3. Close the Rear Cover.