Instructions for the Lexmark C746, C748 Series Fuser Removal
Beyond fuser checks and a few other small things these Lexmark service manuals don’t have a lot to say about the fusing assemblies. On these newer models you have several early warning messages to inform you that the fuser is nearing the end of its life and it can also be monitored through the supplies menu. I’m not exactly sure on this model but on some of the newer models once the unit hits X amount of copies it will no longer work until the fusing assembly is replaced and the counter is reset. Therefore, it is very important that you reset the life counter anytime you replace the fusing unit. Below you will find the instructions for the Lexmark C746, C748 Series Fuser Removal along with the fuser life reset procedure. Also, I have listed the most common error messages associated with the fusing assembly that will most likely lead to the fusing assembly needing to be replaced.
Warning Messages that will or might lead to Fuser Replacement.
80 Fuser Near Life Warning
80 Fuser Life Warning
80 Replace Fuser
80 Fuser Missing
80.41 Fuser missing
120.00–120.21 Fuser Error

Last updated on April 18, 2024 10:24 am


Lexmark C746, C748 Series Fuser Removal
1. Turn off the printer.
2. Open the front access door.
3. Open the top access door.
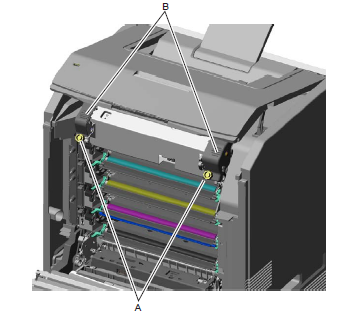
4. Rotate the fuser thumbscrews (A) counterclockwise until loosened.
5. Grasp the handles (B), slide the fuser out from the printer.
Installation note: When installing a new fusing assembly you will want to reset the fuser life counter through the configuration menu and run the motor calibration adjustment. Below you will find the instructions on how to perform these actions.
1. Enter the Configuration Menu. (Turn off the printer, press and hold buttons 2 and 6, turn on the printer, and release the buttons when the progress bar displays.)
2. Press OK button for the Reset value.
“Resetting Fuser Count Value“ will appear on the control panel if done correctly.
3. Select Motor Calibration from the CONFIG MENU.
“Calibrating” will be displayed on the control panel if done correctly, and the printer prints several blank pages and then returns to the CONFIG MENU.
4. Select Exit Config Menu.
Lexmark X748 fuser unit
Printer Norge – How to guide Hvordan bytte Lexmark x748 fuser unit. How to fit Lexmark x748 fuser unit. Lexmark 40X8110 Vår nettsider – our websites. (Salg, leie og service) http://printernorge.n…