Instructions for the Lexmark C734, C736 Fuser Replacement
These new Lexmark service manuals can be frustrating. Some of them tend not to be very good at telling what the life of some of the supplies are. From what I gather the fuser life of these machines is around 100,000 prints at 3 prints per print job. That tells me it might be counting revolutions so if you print single page jobs it might not last as long or if you do big print jobs it might last longer. If you want to know, there is a supply menu for this item to give you additional details on its usage. Below find the Lexmark C734, C736 Fuser Replacement instructions.
Lexmark C73x, C74x, X73x, X74x Fuser Maintenance 110-120V

Newer Lexmark machines have more 80 scheduled service messages than older models. Now, I didn’t see it in the service manual for this machine but on some of them, once the fuser hits X amount of life then the machine stops till the fusing assembly is replaced and the life counter is reset. Therefore, anytime you replace the fusing unit it is very important that you reset the fuser life counter in diagnostic configuration menu. At the bottom of the replacement instructions you will see the information to guide you through this procedure.
Lexmark C734, C736 Fuser Replacement Procedure
1. Turn off the printer. The Fusing unit is extremely hot. To avoid problems you might want to allow 15 to 30 minutes of cooling before you remove the unit.
2. Open the front access door.
3. Open the top access door.
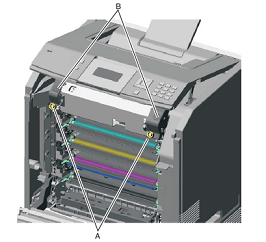
4. Rotate the fuser thumbscrews (A) counterclockwise until loosened.
5. Grasp the handles (B), slide the fuser out from the printer.
 –
–
–
–
–
–
–
–
Fuser Life Reset Procedure for the Lexmark C734, C736 Series Machines
Installation note: If you install a new fuser, be sure to reset the fuser counter in the Configuration Menu, and run the Motor Calibration.
1. Enter the Configuration Menu. (Turn off the printer, press and hold Select Button ( check mark ) and Right Arrow Button while turning on the printer. Release the buttons when the clock graphic displays.
2. Press Select Button ( Check Mark ) for the Reset value.
“Resetting Fuser Count Value” will appear on the control panel display
3. Select Motor Calibration from the CONFIG MENU.
Calibrating displays, and the printer prints several blank pages and then returns to the CONFIG MENU.
4. Select Exit Config Menu.