Diagnosing The Fuser Life Over on the Dell 5110CN Printer
Not much you can do when the Replace Fuser, Fuser Life Over message appears on the display. The fusing assembly has a chip in it the reads the number of times it has been used. After 95,000 prints the fuser is officially at the end of its life and replacement is necessary to continue using the machine. Follow the instructions below to check the fuser life and replace fuser if needed.
Entering diag. Customer mode to Check Replace Fuser Message
1. Turn off the power.2. Turn on the power while holding down “↑†and “↓†keys.
3. Release the fingers from these keys when “Diagnosing…†is displayed.
4. The “Customer Mode†and “ESS Diag†are displayed. (Entered the Diag. mode.)
5. Scroll down to PARAMETERS the Scroll down to FUSER LIFE
5110CN Fuser Kit, 310-8729, KX494 Removal Procedure

Note: The FUSER part is very hot. Take added care not to get burned when carrying out service operation.
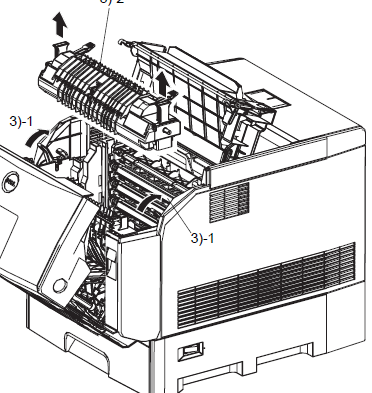
1 Release the latch and open OUTER DUPLEX ASSEMBLY.
2. Open IMAGING DRUM COVER.
3. Pull LEVER FUSER, remove FUSER holding the left and right handles by hands.
4. Hold the left and right handles of FUSER, attach FUSER on INNER DUPLEX ASSEMBLY with the boss and connector mounted underside of FUSER aligned with the hole in INNER DUPLEX ASSEMBLY
5. Push LEVER FUSER, fix FUSER.
6. Close IMAGING DRUM COVER.
7. Close OUTER DUPLEX ASSEMBLY.
For more details and pricing options click on the link below for further information.


the type is ofuscated in key areas of the text presumably because they were imported images thumbnails.