Canon imageRUNNER 2025i Fuser Removal and Replacement FM0-0160-000, FM3-3651-000
Fuser Removal and Replacement
These fusers are rated at around 150,000 pages. Below you will find the Canon imageRUNNER 2025i fuser removal and replacement instructions along with a link at the bottom of the page to order in a new fuser if needed.
Canon imageRUNNER 2025i Fuser Part Number : FM0-0160-000, FM3-3651-000
Canon imageRUNNER 2025i Fuser Removal and Replacement Procedure
Removing the Fixing Unit
1. Draw out the drum unit.
2. Detach the rear cover.
3. detach the left cover (rear).


4. Disconnect the connector (1) of the junction harness and remove the reusable band (2), then remove the earth wire (3).
5. Remove the screw (1) securing the door support band. Remove the connector (2) and reusable band (3), and release the duplex unit harness from the wire saddle (4).
6. Open the left door until it sops and pull out the hinge shaft (1).
7. Lift the left door with both hands to release it from the door rotation shaft (1), and then remove the left door.
8. Detach the inner cover (1) at the upper front.
9. Detach the heater harness cover (2). Disconnect the connector (3).
10. Disconnect the two connectors (1), and then release the fixing unit harness from the wire saddles (2).
11. Raise the delivery upper guide (1). Remove the fixing unit (3).
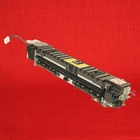 Canon FM0-0160-000 Fuser (Fixing) Unit – 120 Volt (Genuine) – $314.95Genuine Canon FM0-0160-000 Fuser (Fixing) Unit – 120 Volt; Fuser Assembly / Unit – Genuine Canon Fuser Assembly; Mfr PNs: Canon FM3-3651-000 |

