Canon imageCLASS MF5850dn Fuser Removal and Replacement RM1-6405-000, FM4-3436-000
Canon imageCLASS MF5850dn Fuser Removal and Replacement
I really like these machines. They seem to be really well built and I’ve seen some amazing page counts on them. The fusers tend to last around 150,000 to 200,000 prints. About that time you will start seeing print quality problems around the edges as the outer coating on the fixing film breaks down. Below you will find the Canon imageCLASS MF5850dn fuser removal instructions for these machines along with links to buying options for them.
Part Numbers :
Canon RM1-6405-000cn, FM4-3436-000
HP RM1-6405-000cn
The Canon imageCLASS MF5850dn Fuser Works in Following Models
Canon imageCLASS D1120, Canon imageCLASS D1150, Canon imageCLASS D1170, Canon imageCLASS D1180, Canon imageCLASS D1320, Canon imageCLASS D1350, Canon imageCLASS D1370, Canon imageCLASS LBP6300dn, Canon imageCLASS LBP6650dn, Canon imageCLASS LBP6670dn, Canon imageCLASS MF5880dn, Canon imageCLASS MF5950dw, Canon imageCLASS MF5960dn, Canon imageCLASS MF6160dw, Canon imageCLASS MF6180dw, Canon imageRUNNER LBP3470, Canon imageRUNNER LBP3480, Canon LASER CLASS 650i, HP LaserJet P2035, HP LaserJet P2035n, HP LaserJet P2055d, HP LaserJet P2055dn, HP LaserJet P2055x
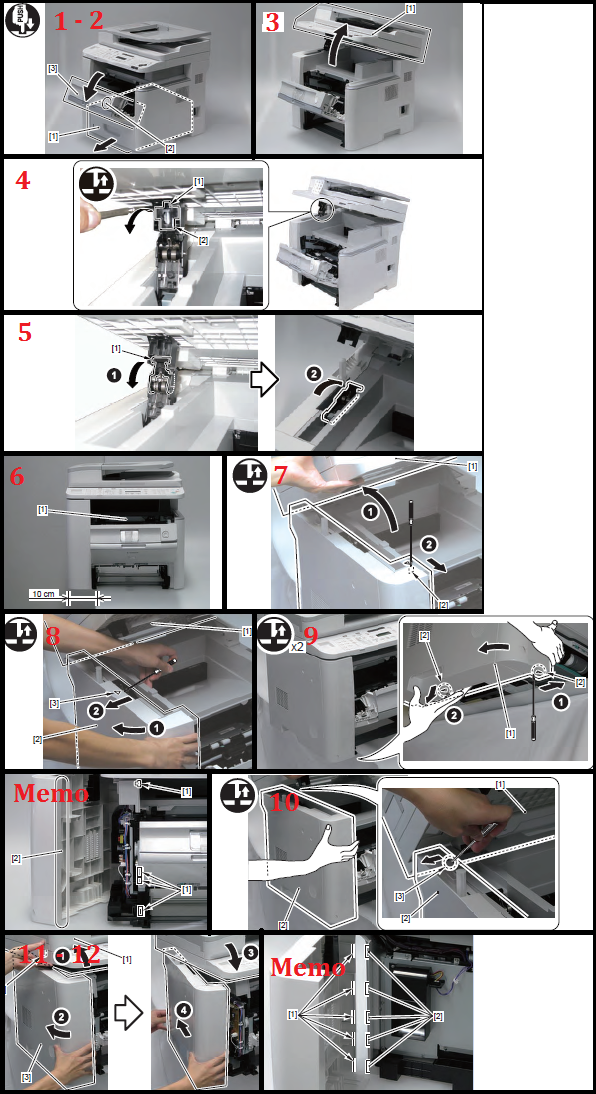
Canon imageCLASS MF5850dn Left Cover Removal
1. Remove the cassette.
2. Press the Open button, and open the Cartridge Door Unit.
3. Open the ADF Unit + Reader Unit.
4. Release the claw, and remove the Arm Cover.
5. Release the Connection of Arm and turn it toward the rear.
6. Place the host machine while shifting the left side of it approx. 10cm from the working table.
7. Open the ADF Unit + Reader Unit , and release the claw.
8. Open the ADF Unit + Reader Unit , and release the claw while pulling the Left Cover in the direction of the arrow.
MEMO :
Be sure to release it while releasing the edge area of the Left Cover from 4 Hooks of the Upper Cover and Front Cover.
9. While opening the Left Cover in the direction of the arrow, release the 2 Claws at lower side.
10. Open the ADF Unit + Reader Unit , and release the claw.
MEMO :
Be sure to release the claw while holding the Left Cover.
11. Open the ADF Unit + Reader Unit , and remove the boss from the Left Cover.
12. Remove the Left Cover.
MEMO :
At installation, be sure to fit the Left Cover to the 5 Protrusions of the Left Rear Cover.
13. After removing the Left Cover, place the host machine in the center of working table.
Canon imageCLASS MF5850dn Right Cover Removal
1. Remove the cassette.
2. Press the Open button , and open the Cartridge Door Unit.
3. Open the ADF Unit + Reader Unit.
4. Release the claw , and remove the Arm Cover.
5. Release the Connection of Arm and turn it toward the rear.
6. Place the host machine while shifting the right side of it approx. 10cm from the working table.
7. Open the ADF Unit + Reader Unit , and release the 2 Claws while pulling the Right
Cover in the direction of the arrow.
MEMO :
Be sure to release it while releasing the edge area of the Right Cover from 4 Hooks of the Rear Cover.
8. Close the ADF Unit + Reader Unit, and release the 2 Claws at lower side while pulling the Right Cover in the direction of the arrow.
9. Open the ADF Unit + Reader Unit , and release the claw while pulling the Right Cover in the direction of the arrow.
10. Remove the Right Cover.
MEMO :
At installation, be sure to fit the Right Cover to the 4 Protrusions at front side of the host machine.
11. After removing the Right Cover, place the host machine in the center of working table.
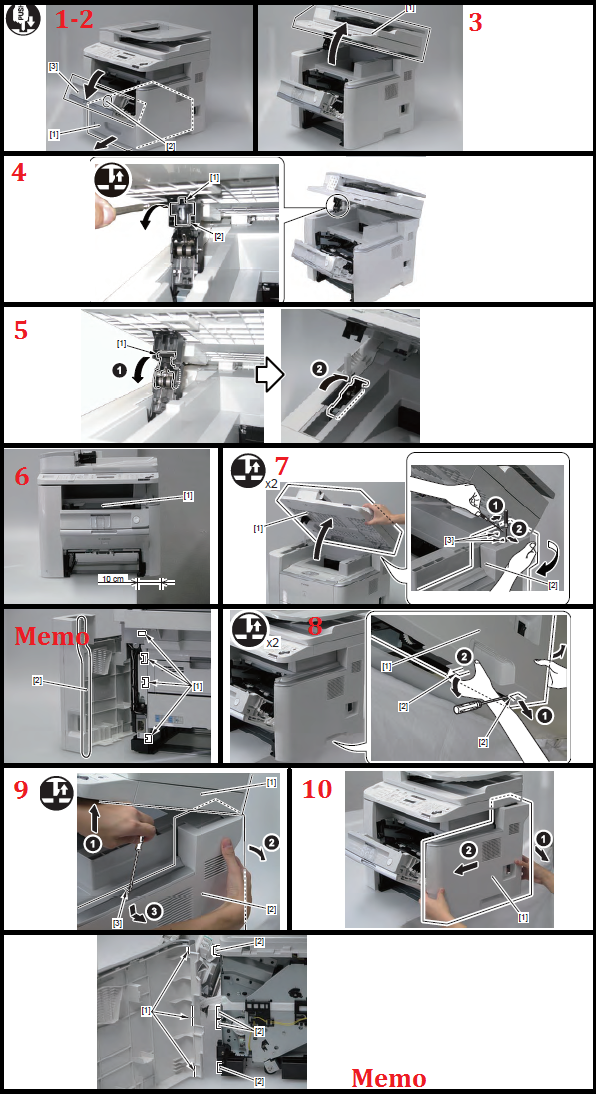
Canon imageCLASS MF5850dn Left Rear Cover Removal
1. Open the ADF Unit + Reader Unit , and release the 2 Claws.
2. While lifting left side of the host machine , remove the Left Rear Cover.
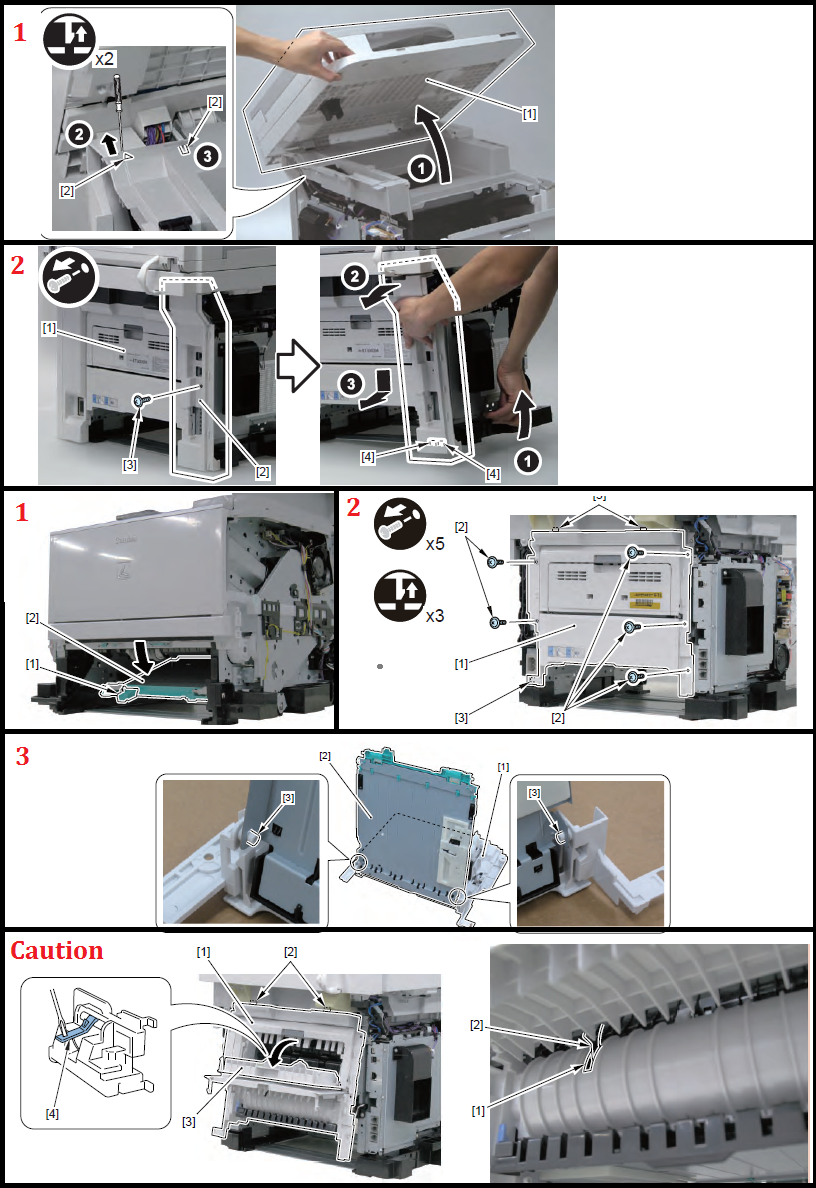
Rear Cover Removal
1. Push the Grip Downward and Open the Duplex Feed Unit.
2. Remove the Rear Cover Unit.
3. Remove the Duplex Feed Unit from the Rear Cover Unit.
CAUTION :
Procedure at installation
1. Fit the 2 Upper Claw of the Rear Cover Unit With the Upper Cover Unit.
2. Open the Sub Output Tray and While Pushing the Duplex Reverse Sensor Flag
Downward, Install the Rear Cover Unit.
3. Check That the Sensor Flag Protrudes Through the Hole of the Guide Unit On
the Back of the Duplex Unit Cover.
Note :
The engine boards on these machines are different so fuser removal is slightly different. While a regular technician might not really notice the difference, I’ve included both sets of instructions.
Canon imageCLASS MF5850dn Fuser Removal Type I
CAUTION:
When Removing the Fixing Unit, Perform the Operation After the Fixing Unit is Surely Cooled.
The Fixing Unit Just After Printing May Cause Burn Injury.
1.Close the Front Cover and Move the Gear In the Position Where It Can Be Removed.
2. Remove the 3 Gears.
CAUTION:
Points to Note at Installation
Fit the Protrusion of the Gear (21T. With the Cut-off of the Gear and Install it.
Fit the Cut-off of the Gear (21T. With the Teeth of the Fan Gear and Install it.
3. Remove the Duplex Feed Sensor Unit.
4. Remove the Harness from the 2 Harness Guide.
5. Remove the Feed Guide.
6.Remove the Fixing Unit.
CAUTION:
Do Not Disassemble the Fixing Unit at a Field.
It May Cause a Malfunction.
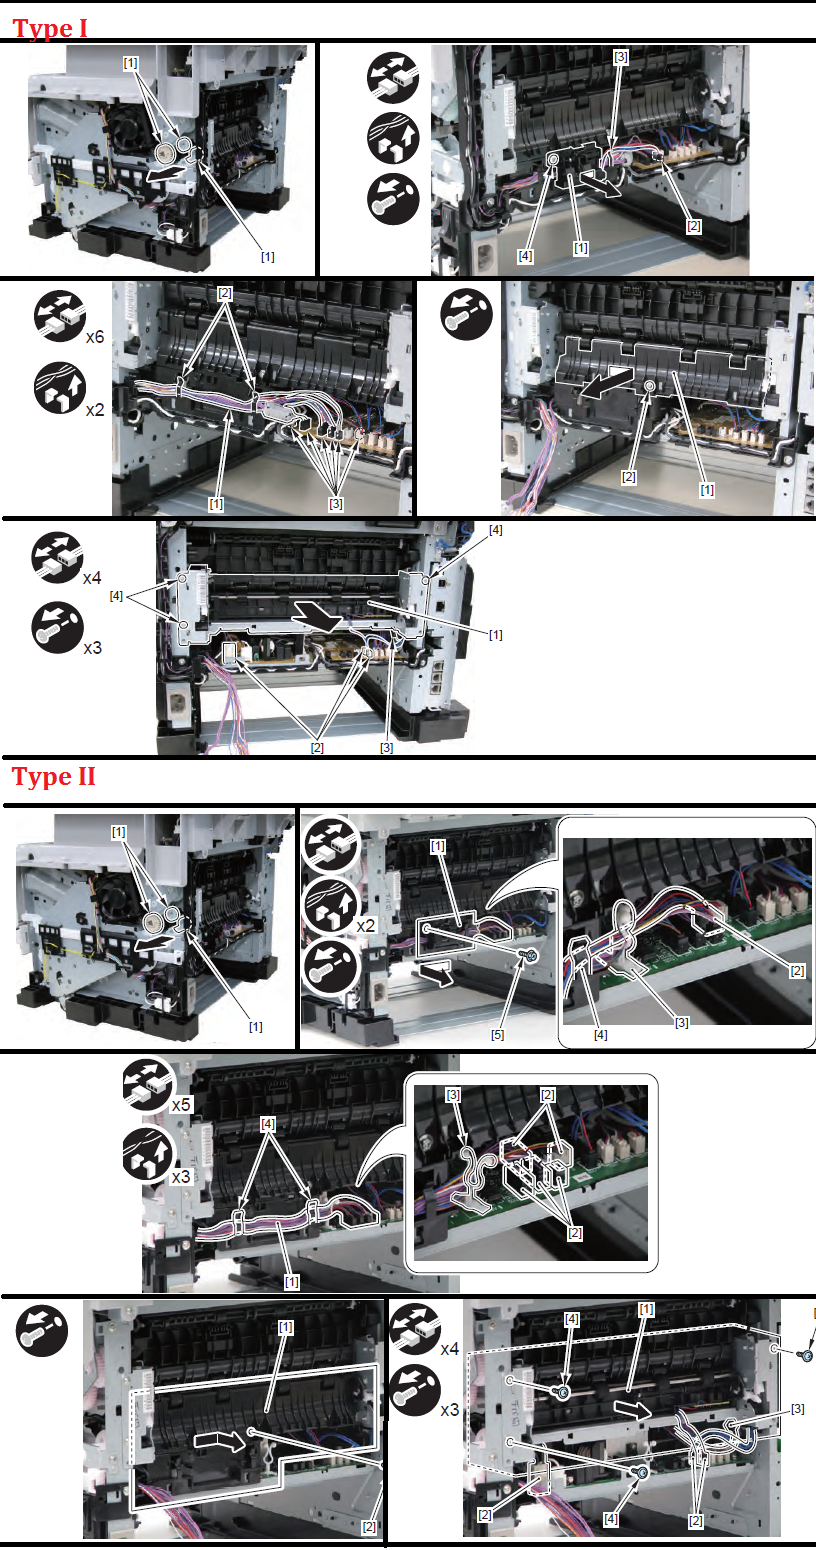
Canon imageCLASS MF5850dn Fuser Removal Type II
CAUTION:
When Removing the Fixing Unit, Perform the Operation After the Fixing Unit is Surely Cooled.
The Fixing Unit Just After Printing May Cause Burn Injury.
1.Close the Front Cover and Move the Gear In the Position Where It Can Be Removed.
2. Remove the 3 Gears.
CAUTION:
Points to Note at Installation
Fit the Protrusion of the Gear (21T. With the Cut-off of the Gear and Install it.
Fit the Cut-off of the Gear (21T. With the Teeth of the Fan Gear and Install it.
3. Remove the Duplex Reverse Sensor Unit.
4. Remove the Harness from the 2 Harness Guide.
5. Remove the Feed Guide.
6.Remove the Fixing Unit.
Note
I’ve found the easiest way to re install the gears is to put the fuser back in the machine and install the gears before you put the screws back in. If you tighten the screws first, it makes it a lot harder to get the gears properly aligned for correct installation.

amazon_link asins=’B010O0NYQM’ template=’ProductGrid’ store=’laser-printer-parts-20′ marketplace=’US’ link_id=’41a4a18c-2837-11e7-85b7-69ce63746923′]

