Brother HL-2040 Fuser Replacement Procedure
Below you will find the illustrated Brother HL-2040 Fuser Replacement Procedure. Everybody is running out to replace the fusers in these machines. Not really, but they are nice machines and might be worth it, if you want to tackle this repair yourself.
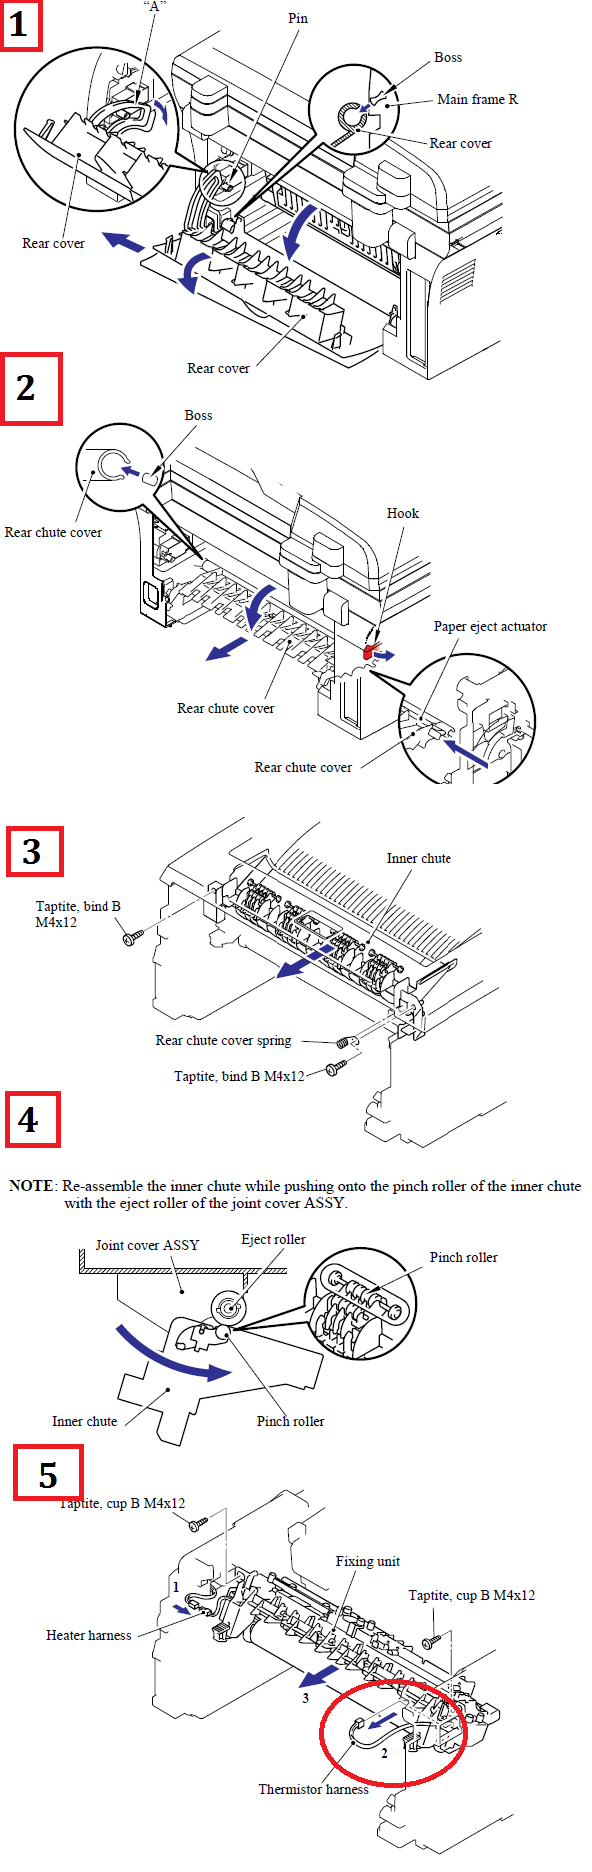
There are two types of fusers for this model. You can either go by the serial number or the thermistor cable. One has a white thermistor cable and the other has a gray cable. If you look at step 5., I have circled the cable in question.
DCP7020, MFC7420, MFC7820N, FAX2820, FAX2920, MFC7220, MFC7225N
SERIAL NUMBER IS BEFORE E5J929990 (old I style) – LM6721001
DCP7020, MFC7420, MFC7820N, FAX2820, FAX2920, MFC7220, MFC7225N
SERIAL NUMBER IS AFTER E5J929990 – LM6722001
1. Brother HL-2040 Rear Cover
(1) Remove the rear cover.
NOTE: Remove the “A” section of the rear cover while opening the rear cover slightly.
2. Brother HL-2040 Rear Chute Cover
(1) Remove the rear chute cover.
(2) Remove the paper eject actuator and the eject actuator spring.
3-4. Brother HL-2040 Exit Assembly
(2) Remove the two bind B M4x12 taptite screws and the rear chute cover spring.
(3) Remove the inner chute.
NOTE: Re-assemble the inner chute while pushing onto the pinch roller of the inner chute
with the eject roller of the joint cover ASSY.
5. Brother HL-2040 Fuser Replacement
(1) Disconnect the heater harness connector and thermistor harness connector.
(2) Remove the two cup B M4x12 taptite screws, and then remove fixing unit.
Note : The pictures below show the MFC model. However the removal and replacement instructions are the same for the HL-2040 series. Sorry for any confusion this may cause.
The tricky part of this repair, for myself, is putting the exit assembly back in. This will take a little bit of patience. Also, if you have the exit assembly out, it might not hurt to clean the exit rollers inside of the machine. They are known troublemakers when they get dirty. Below you will find links to order in a replacement fuser or if you decide it’s time to move on then I’ve added a few replacement models below.
SERIAL NUMBER IS BEFORE E5J929990 (old I style) – LM6721001
SERIAL NUMBER IS AFTER E5J929990 – LM6722001

