Xerox Phaser 6125, 6130, 6128 MFP Fuser Replacement Instructions
Information for the Xerox Phaser 6125, 6130, 6128 MFP Fuser Replacement Procedure
These Xerox machines aren’t the strongest machines in Xerox’s line of high quality machines but with their affordable price and strong print engines they can get the job done when put to the task. The fusing assembly in these machines is rated at around 50,000 prints and copies. Below I have listed a few of the most common fuser error codes related to these machines along with instructions for the Xerox Phaser 6125, 6130, and 6128 MFP Fuser Replacement and life counter reset procedure.
List of Fuser Related Errors and Messages
Xerox Phaser 6128 MFP List
Replace Fuser – 010-351 Printer – The Fuser has reached the end of its life.
Fuser Error – Error 010-397 – Generic Error – This will be followed by a more specific numerical error
010-317 – Reseat Fuser – Fuser is detached – power off – reseat then power back on
Copy, Scan, Fax, Fuser Life – Early warning that Fuser Life is low
Xerox Phaser 6125, 6130 List
010-317 Insert Fuser
010-351 Replace Fuser
010-397 Fuser Error
Fuser Life Replace Soon

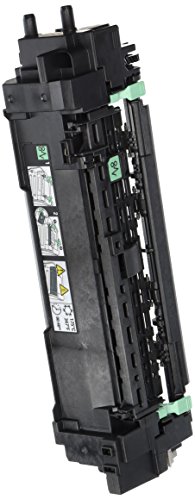
Fuser Part Numbers
126K24951 – Xerox Phaser 6125, 6130
675K65655 – Xerox Phaser 6128 MFP
The part numbers are different but compatible with the 6125, 6130, and 6128 MFP
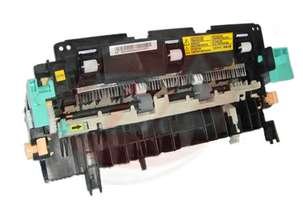
Xerox Phaser 6128 MFP Fuser Replacement Procedure
Warning – Allow the Fuser to cool before using this procedure.
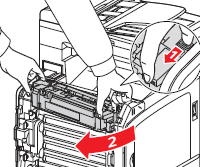
1. Open the Front Cover.
2. Pull the lever to release the lock. Step 1 in the picture below.
3. Swing the right side of the Fuser toward you with the lever released to unplug the fuser connector. Step 2 in the picture below.
–
–
–
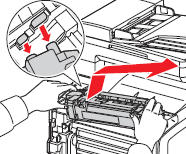
4. Lift the Fuser up, then to the right to remove it.
–
–
–
Replacement Note
Anytime you replace the Fusing Assembly you should reset the Fuser life counter. Follow the instructions below.
Xerox Phaser 6125, 6130, 6128 MFP Fuser Counter Reset Per the Service Manual
Fuser reset is required when a new Fuser is installed. This function sets the life counter to “0.â€
1. From the Control Panel, press the System button.
2. Press the Up Arrow or Down Arrow button to find Admin Menu. Press the OK button.
3. Press the Up Arrow or Down Arrow button to find Maintenance Mode. Press the OK button.
4. Press the Up Arrow or Down Arrow button to find Reset Fuser. Press the OK button.
5. “Are you sure?†message is displayed. Press the OK button to start the process.
6. Initializing… –> Initialized messages are displayed.
7. The Maintenance Mode – Reset Fuser menu is displayed when the process is completed.