Optra T Fuser Replacement Procedure For the Lexmark T630, T632, and T634 Series Printers
Like most my fuser removal articles the point of this article is to provide instructions for some other articles I wrote of fuser related problems for the Optra T 630 series machines. Below is the Optra T fuser replacement procedure for the 630 series machines. Pretty, straight forward and easy to do. My main concern for people doing this replace is the routing of the DC cabling. Make a note of how the cabling is ran. Some fusing assemblies come with multiple DC boards. Make sure you use the same type of board that was on the fuser you took out.
Optra T Fuser Replacement Procedure
1. Remove the Fuser Wick Cover Assembly. Item 1 in picture below.
2. Remove the Redrive Cap Cover Assembly. Pull Up.
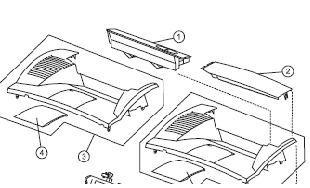
3. Remove the Redrive door assembly.
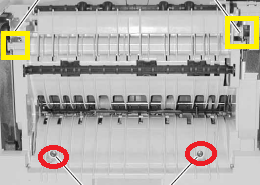
4. Remove the two mounting screws. Location circled in Red.
5. Release the Redrive assembly latches ( yellow Squares ) and gently pull the assembly out and away from the machine.
6. Remove the two screws securing the fusing assembly marked in red.
7. Disconnect the AC and DC power cables marked in yellow.
8. The DC and AC cables are wrapped around several parts. Take note how they are fed through the machine and remove. You might want to take a picture on your phone.
9. Installation note. The new fusers typically come with lock tabs. Before you install the unit make sure to remove the lock tabs.
 –
–
–