Brother DCP/MFC 9010, 9120, 9320 Fuser Unit Removal Procedure
Fuser Unit Removal Procedure for the Brother DCP/MFC 9010, 9120, 9320
After 50,000 prints the machine will display Replace Fuser message and the fusing assembly should be replaced. Other signs of extreme fuser wear can be smears down the page as the pick fingers wear the outer coating of the hot roller film away. Ghosting down the middle of the page due to build up of toner on the hot roller, and jamming in the rear of the machine. If you are experiencing any of these problems then the fuser should be removed and check for wear and tear. If problems are found with the unit then follow the instructions below for the Fuser Unit Removal Procedure.
Brother DCP / MFC 9010, 9120, 9320 OEM Fuser Unit – LU5796001

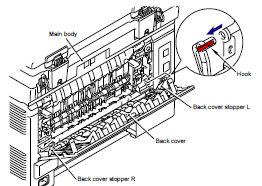
Back Cover Removal
1. Open the Back Cover.
2. Release the Hook and remove the Back cover stopper L and R from the Main body.
3. Remove the Bush of the Back cover from the Shaft at the right side of the Main body.
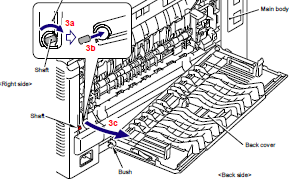
4. Remove the Back cover from the Shaft at the left of the Main body.
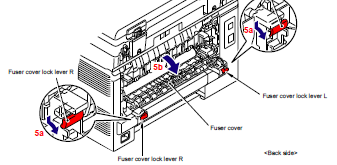
Fuser Cover Removal
5. Release the Fuser cover lock lever L and R, and open the Fuser cover.
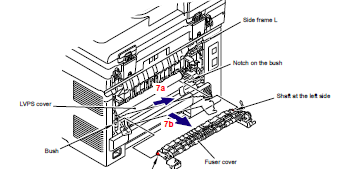
6. Take out the Shaft at the left side of the Fuser cover from the Notch on the Bush of the Side frame L.
7. Take out the Shaft at the right side of the Fuser cover from the Bush of the LVPS cover, and remove the Fuser cover.
Left and Right Fuser Cover Removal
8. Remove 1 screw, and then remove the Fuser cover L from the Fuser unit.
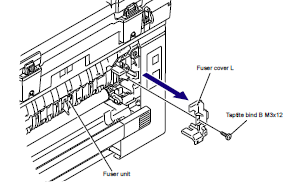
9. Remove 1 screw, and then remove the Fuser cover R from the Fuser unit.

Fuser Connector Removal
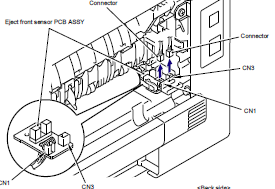
10. Disconnect the two Connectors (CN1, CN3) from the Eject front sensor PCB assembly.
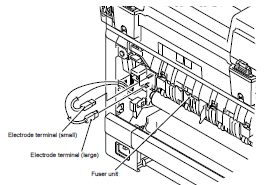
11. Disconnect the two Heater terminals from the Fuser Unit.
Fuser Unit Removal Procedure
12. Remove the two screws, and the remove the Fuser unit from the Main body while holding the A

Alright, hopefully that helped you remove and replace the fuser unit if needed. Click on the pictures for a better view of them. Click on the link below for additional buying options and information.
Brother DCP / MFC 9010, 9120, 9320 OEM Fuser Unit – LU5796001

