Open Heat Error and Fuser Replacement for the Xerox Phaser 3300 MFP
Diagnostic Tips for the Open Heat Error on the Xeorx Phaser 3300 MFP
The open heat error in these machines means that the AC power is not going through the fusing assembly, Xerox Phaser 3300 MFP Fusing Assembly, JC96-03799B, 126N00265 . Typically, you will either see an over heat or a low heat message first, then when the machine resets you get the Open heat error if you have additional issues. A few things can result in this problem so in this article I’d give some tips. Now if you just want to replace the fusing unit you can skip the troubleshooting steps and go straight to the fuser replacement procedure.
–
1. Turn the machine off, unplug, let it sit 30 to 60 minutes then turn back on. This allows the fuser to cool down and the thermostats to reset.
2. Remove the fusing assembly by following the instructions below. Using a volt meter, check for continuity across the heat lamp and thermostat. See below for pictures. There are two thermostats. When the fusing assembly over heats the thermostats are supposed to open cutting off the flow of AC power to the fusing assembly, Saftey Feature. When they cool back down they should close so and everything should go back to normal. What I’ve found is that the thermostats either open to late and melt the fuser or open but fail to close when the machine cools back down. Majority of the time if I have an Open Heat Error it is within one of the thermostats. Remove the thermostats and check continuity across each one. If you find one that is open the best way to close it is to take a can of air, hold it upside down, and give the front of the thermostat a blast of extremely cold air. If done correctly you should hear a popping sound as it snaps back in place. Check continuity again. Install fuser and turn back on. If it still fails then the next step is to replace the fusing unit.
3. If the machine starts working again, print off the system data report and check the page count at the bottom. If the unit has around 80,000 prints the fusing assembly is at the end of its life. Also, if the error repeats then replace. Finally, when you have the fusing assembly out of the machine look for signs of extreme wear. Check the hot roller for discoloration, toner build up, or scratches around the pick fingers. Check the pressure roller for tears, warped, or wrinkled surface. Check the gears for gear dust and worn down teeth. If you see any of these signs then fuser replacement should be advised. Follow the instructions below for fusing assembly replacement.

Xerox Phaser 3300 MFP Fusing Assembly, JC96-03799B, 126N00265 Removal Procedure
Note: I’ve found it easier to remove the duplex unit and rear door for fuser removal.
1. Open the face up cover and open the fuser output guide.
2. Remove the four screws securing the Fuser Assembly, then pull the Fuser Assembly out of the frame.
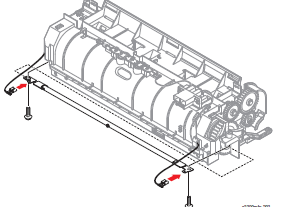
3. Release the CON Harness and REC Harness from the Thermostat and then remove the three screws securing the Thermostat and remove it.
4. To remove the halogen lamp, release the REC harness and CON harness from both sides of the fuser. Remove 2 screws, then carefully slide the halogen lamp out of the fuser.
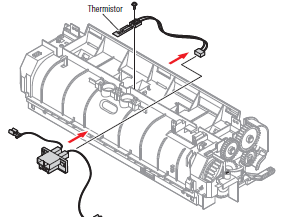
5. Unplug the thermistor harness from the Fuser Harness Connector. Remove one screw then the Thermistor.

 –
–
–
–
–
–
 –
–
–
–
–
–
For details in purchasing a new fusing assembly with buying options and further details chekc out the link below.

Last updated on April 19, 2024 6:56 am

Below are a list of machine’s I personally recommend and sell to my customers. Brother Multifunction printer are by far the best made and durable machines in this small business class category.