Troubleshooting Paper Jam in the exit area on an Xerox Phaser 8560
Paper jam errors in these machines can be one of the most frustrating issues you will run into. The process drive assembly not moving the transfix at the right time can cause the issue. Ink build up on the stripper plate, improper oil on drum surface, and dirty exit rollers can all be issues. And that’s just a few. In this article I’d like to talk about a new one that I ran into the other day.
I was called out for the famous paper jam in the exit area. So I let the machine warm up and when it printed, of course, it jammed in the exit area. I removed the jam and tried again with it doing the same thing. The thing I found odd about this call was that when the paper fed I could hear a low growling sound when printing. Almost like when you hear paper slip on rollers. The machine had an optional 500 sheet tray so I tried that and got the same result.
[contentblock id=2]
From listening to the machine I could tell the noise was coming from the left side. So at first I was thinking something in the media drive assembly or a clutch was causing paper drag and the paper jam message. I pulled the left side cover off and told it to print again. That’s when I noticed the Y-axis belt that drives the drum unit was slipping on the drum pulley.
So I used a flat blade screwdriver and applied more pressure to the belt and it started working again. I removed the tension and it worked for a few pages and started slipping again. I cleaned off the pulley and motor gear surface, replaced the belt and spring and the machine started working the way it should. So if you get a paper jam error on these machines and you hear a noise coming from the left side I would check out the belt that drives the drum unit.
Turn off machine and unplug power and communication cables
Left Side Removal
- Open top exit cover and front door.
- Remove control panel cover by grabbing both sides on the rear and pull out and towards you. The control panel should just drop out. Put the cover off to the side and leave the control panel plugged in and on top of the machine about where it originally was.
- Remove the rear screw. I believe a torx 20. Release the front release latch tab and pull out the left cover.
- If wanted you can also remove the right cover now. This will allow us to see the process drive unit and the tranfix assembly unit work. Same as the left side. Remove rear screw and release the latch tab in front.

Belt and Pulley Removal
Warning The use of safety glasses is recommended for this procedure.
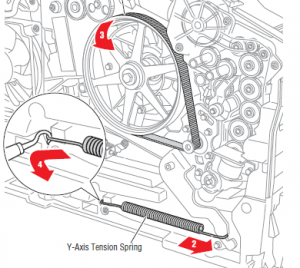
1. Relieve tension on the belt by pulling the end of the spring arm toward the front of the printer using your fingers.
3. Slide the belt off the pulley.
4. Using a spring hook or pliers, remove the Y-Axis Tension Spring from the chassis retainer and spring arm. Brace the printer to keep it from moving during removal of the spring.
Caution This is a strong spring that can cause damage if it slips during removal; use care when removing.
[contentblock id=1]
Find additional printer service tips, manuals, and parts diagrams at: http://www.lbrty.com/resources.html/


Thank’s i had the same problem….
Thank’s i had the same problem….
DO you have any other suggestions for feed issues on this machine? The paper keeps jamming on exit, but I don’t hear this sound you mention so I don’t think this is the issue. But no matter what I do, the paper will not feed!