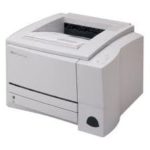
HP Laserjet 2200 Loud noise / Laser Scanner Motor error and Repair
The loud noise or scanner motor error has always been an issue with the early 2000 series machines. Lately, though I’ve been hearing a lot more of these ans so have my part vendors because laser scanner units, RG5-5591, have become hard to find. In the past I use to just replace them with rebuilt units but the last few I recieved I haven’t been to impressed with so I’ve been rebuilding them myself and they sound just as good or better than the rebuilds I had been purchasing.
What Causes the Loud Noise
 Inside the laser scanner assembly is the polygon mirror motor assembly. When the machine first turns on this motor doesn’t start-up. However when you go to print the motor speeds up to 10 to 20 thousands RPM’s. Unsure on this model but you get the idea, really quick. The polygon mirrors just sit on top a motor shaft in the motor housing. Over time dirt and debris works down in the bushings and the oil dissipates leaving a metal on metal contact, with the speeds genetated the dirt builds up and causes even more friction. Eventually, it generates a loud bushing noise when it speeds up like a cooling fan when it goes out. Usually it gets noisy over time so customers, if they want, have time to get it repaired. Once in a great while, without warning the scanner motor will freeze up without warning a generate the error code listed below.
[contentblock id=2]
Scanner Motor Error
The scanner motor error is a fatal error. Whenever the machine receives a fatal error all three lights light up. To see the secondary error code, which actually tells you what is the cause, is either pressing the Go and Cancel Job Button together. The secondary error code for the scanner motor is a solid light pattern of the Attention and Ready LED. If the scanner motor doesn’t get up to speed in the amount of time allowed the printer will display this error to let you know something is up with the unit.
I/O Cover Removal
Pushing the two tabs on the back of the I/O cover, swing the I/O cover
DIMM Cover Removal
1 Open the toner cartridge door.
2 Press and hold the release button
3 Grasp the rear of the cover and pull it away from the printer until it stops.
4 Grasp the front and rear of the cover and swing it out from the printer.
Back Cover Removal
1. Open the rear output bin and release the diverter pivot pins. Let the open door rest on the work surface.
2. Remove the two mounting screws
3. Raise the door to engage the retaining locking bar pivot pins and leave the door open.
4. Unlatch the two rear cover retaining tabs located inside the tray 2 slide area.
5. Pull the rear cover down and then out to remove it.
Note: 2100 Series does not have the diverter pivot pins. The output bin just folders down to a horizontal position
Top Cover Removal
1. Release the swing arm from the toner cartridge door and push it down into the opening.
2. Remove the top-cover mounting screws
3. With the rear of the printer facing forward as shown, remove the top-cover mounting screws.
4. Open the tray 1 door.
5. Release the two top cover tabs located on either side of the toner door.
6. Lift the cover up and off the printer.
When replacing the top cover, make sure the drive release lever is attached to the swing arm. Use the longer of the four mounting screws in the mounting screw-holes located under the toner door.
Laser Scanner Motor Removal
Caution: The mirrors on top of the laser / scanner motor are extremely delicate and can get scratched very easy. If the happens then the assembly can be damaged beyond repair so try not to touch them and if you do remember to use a Q-tip to clean them off before you close the unit back up.
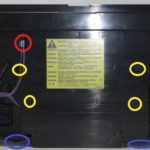
Ok, once you get the top cover off you will see the laser scanner assembly. (Has a yellow warning label on top.) You will have to remove four black screw in the middle and disconnect the wires going into the unit. Using a flat blade screw driver you will need to unclip two tabs in front and two in the back and lift the top cover with the warning label off. Inside the unit you will see several mirrors and lenses. In the back is the motor on top a circuit board. Remove the four black screws holding it in place and gently pull it out. On the back side of the circuit board is a black or white clip that keeps the motor from lifting off. Some turn and pull out while other squeeze together and pull out. Either way you probably will need a pair of needle nose pliers. Once you have the plastic clip off you can gently remove the motor from the housing. I typically then use alcohol to clean off the motor shaft and take some cotton off the top of a Q-tip get it damp with alcohol and clean out the motor housing that the shafts sits in then I use a little light machine oil and lightly coat the shaft and put a small tiny drop in the motor housing. Insert the motor back in the housing, install the clip back in place and install the motor. Follow the instruction to clean out the optics before you put everything back together.
Cleaning the Laser Scanner Unit
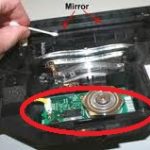
If the laser scanner is relatively clean inside then I would just clean the front mirror shown in the picture below and the motor mirrors located in the bottom of the unit on top the motor. Use a Q-tip to clean the mirrors. If you see any build up on the Q-tip get a new one before proceeding to the next mirror. The most important thing here is to take your time and be gentle. The motor mirrors are metal and extremely delicate. They are very easy to scratch. You should notice before you clean the units a build up of dust and debris on the mirrors. Especially on the left side of the motor mirrors. If the unit is very dirty inside then I would clean all the mirrors and lens inside the unit and blow it out before I put it back together.
Additional Parts that need Removed on the 2300 series.
Front cover
1. Open the top door.
2. Open tray 1.
3. Remove two screws from the front cover.
4. Lift the cover straight up and away from the printer.
Control panel
1. Remove three screws from the control panel.
2. Disconnect one connector.
3. Lift the control panel away from the printer.
Conclusion about the loud noise scanner motor error
Hopefully, this article has helped you work through your loud noise or scanner motor issues in your Hp laserjet 200 series printer. Below is a link to a laser scanner unit if you want or sometimes need to replace it. I’ve been rebuilding them more often because the cost of new machines have gotten so cheap people tend to want to replace these machines if they get more than $150 involved in the repair.
Now if your thinking about upgrading to a new printer click on the links below for great replacement models.
HP LaserJet Pro 400 M401dn Series Printer Review
–
–
–
–
–
HP LaserJet P3015N Enterprise Printer Review
–
–
–
–
–
[contentblock id=1]
Find printer service newsletters, parts, and more at: http://www.laserpros.com/


