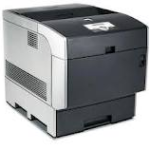
No Color Because of Clogger Toner Auger in the Dell 5100CN Printer
In my first article about missing color in the Dell 5100cn I talked about how the developer drive assembly breaks resulting in the developer mag rollers not rotating. In this article I will talk again about no color issue in the Dell 500cn but focus on how to fix a clogged toner auger tube if that happens to be causing the no color issue in your printer.
Troubleshooting the No Color Issue in Your Printer
First thing to do is trying to reproduce the no color problem so you can see what’s going on. If you have a PC handy or the customer is around you can have them print an example. If not, the printer doesn’t really have a good test print to see color issues. The best thing I have found is the PCL font pages. At the top of the first page it prints four bars of color across the page. If one of your colors is faded or missing it’s pretty obvious. After you know which color isn’t working open the covers and remove the drum unit. Behind the drum unit is the developer assembly. You will see the four developers and at the front is the developer mag rollers which are covered in toner. If you have a color problem like cyan, magenta, or yellow then the mag roller will appear black unlike the others that are the color they are providing. If the mag roller is black that means there is no color in the developer for that color. So we know it’s most likely a clogged toner. Usually, if it’s related to the developer drive assembly then the mag roller for the offending color will still have color on it.
Toner Auger System Removal
Main Cover
1. Remove the Top Cover
2. Open the Door A.
3. Remove the Toner Cartridges.
4. Open Door C.
5. Remove 2 screws that secure the Top Main Cover.Top Front on either side of the top lid.
6. Release the 2 hooks at the rear of the cover.
7. Hold Door C open slightly. Pull out and remove the Top Main Cover toward the back of the printer
Left Side Cover
1. Remove the Top Main Cover.
2. Remove the screw that fixes the Left Side Cover. Far Back Rear Left Corner
3. Slide the cover rearward to release the hook on the front that also holds the Left Side Cover and remove
HVPS
1. Remove the Top Main Cover.
2. Remove the Left Side Cover.
3. Unplug connectors.
4. From the left side of the printer remove the 2 screws and 3 screws that secure the HVPS to the frame.
5. Move the HVPS left to release the retaining hooks on the front edge of the board.
Replacement Note
Verify that the two bosses are aligned and the two retaining hooks are locked on the board before tightening the mounting screws.
Toner Auger Tubes
Warning: There really is no way to avoid toner spillage in this process. The best you can do is to be gentle and slow when handling the auger tubes. Once removed have a towel at hand to place underneath. When you unclog the tubes lots of toner comes out so be prepared. If you make a mess a vacuum should be used. Canned air just moves toner around can get behind the laser mirrors resulting in more tear down. I rarely use canned air in color machines. Most times only after I have really cleaned up the machine and most times I never blow it inside the machine. Cleaning up toner on a surface works best if you have a damp towel.
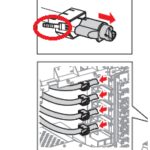
Alright, at this point you have the four toner augers. Pretty easy to tell which color is which. You will see that on the right side it disappears and goes into the developer unit. Where it goes into the developer is a white clip. Shown to the right. Pinch the clip on the color you need and slowly remove it. Take an old towel and place it underneath the end. The end has a spring-loaded cap on it the covers the hole in the tube. Push the cap back exposing the opening. If its clogged it will be clumped up at the end of the tube. Take a small paper clip or tool and gently break up the clump. Till when you open and close the cap or move the tube toner drops out. After your satisfied toner is again flowing through the tube then reseat the auger tube back in the developer. Make sure it clips in then put the rest of the machine back together.
Conclusion about the No Color in the Dell 5100cn Laser Printer.
Once you have the machine put back together run the PCL font pages again to look at the colors. Your no color probably has changed to partial color. No exactly what you hoped for right? Scroll through the menus to the maintenance section. Enter and scroll to the developer cleaning part. Once you enter into that it will give you the option to clean the individual colors. Pick the color that was given you the no color problem and press enter. It will ask you if your sure and press enter again. Now the machine will run for awhile filling the developer back up with toner. After it is done run the PCL font page again and if your no color issue was a result of the toner auger tube being clogged the color should be restored. Alright, hopefully that has helped you work through your no color issue on your Dell 5100cn clolor laser printer. As always, majority of the time I run into faded, missing, or no color problems the customer is running third party toners so I always advice not using them in this machine and make sure before you remove the seal on a new cartridge make sure you shake it up a little to get rid of clumps inside the unit and get some air in the toner so it flows better.
Find printer service newsletters, parts, and more at: http://www.partsnow.com/


