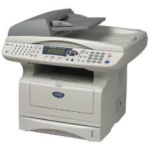
Brother DCP 8040, 8045 MFC 8440, 8640, 8840, 8840 Fuser Replacement
Well, if you still have one of these brother workhorses you might now be needing or pretty soon have to replace the fuser. Fuser replacement in these models is pretty easy compared to some of the earlier models where you had to dissect the whole machine in order it replace it. In this article I’d like to talk about some of the signs that let you know the fusing unit is on its way out, things to look for on the fusing assembly, and instructions on fuser replacement if needed.
Brother MFC 8840, 8440, 8640, 8220, LM2579001 Fusing Assembly
Troubleshooting Fuser related problems in the Brother DCP 8040, 8045 MFC 8440, 8640, 8840, 8840
Remember, if the machine has been on the fuser in back will be around 350 decrees. So if you feel the need to remove or touch it please wait around a half hour before inspecting or fuser replacement.
Probably, the best way to troubleshoot the fusing assembly to find out if fuser replacement is needed is to open the back door, drop down the exit assembly chute and check the surfaces of the hot and pressure roller. The pressure roller on the bottom is orange and should be smooth. If it is coated in toner or if it has waves or ripples running through it, it should be replaced because this can lead to ghosting or jamming in the rear of the machine. The hot roller is on top and is a light tan cover. Separation claws ride up against it and cause scoring on the surface every inch or so. If it still has its coating you shouldn’t have to worry but if you start to see the metal underneath the tan coating or a build up of toner in these areas than fuser replacement should be done. Also, same as the lower pressure roller, if you see build up of toner across the surface than ghosting or poor image quality can result. The diameter of both rollers is 78.5mm or 3.09 inches. So another way to check if your fuser rollers are making marks on your paper is to measure the distance from your first defect to the next. If they match the above spacing than the fusing assembly is most likely the cause. If your machine is ghosting, repeating image from the top of page further down the page. Then check the distance from the original print to the repeat print to see if it measures the same as above.
Fuser Replacement in the Brother DCP 8040, 8045 MFC 8440, 8640, 8840, 8840
Fixing Unit
1. Disconnect the AC cord from the machine.
2. Close the front cover and pull out the paper tray.
3. Remove the DX feed ASSY.
4. Remove the rear cover MP ASSY.
5. Remove the outer chute MP ASSY.
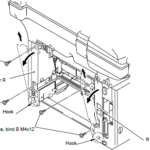
6. Remove the two screws, and then remove the rear cover L.
7. Remove the two screws, and then remove the rear cover R.
8. Remove the two screws, and then remove the NCU unit.
9. Disconnect the heater harness and thermistor harness.
10. Remove the 1 screw and the shoulder screw, and then remove the fixing unit.
Conclusion about Fuser Replacement in the Brother DCP 8040, 8045 MFC 8440, 8640, 8840, 8840
Like I said, Fuser Replacement in the Brother DCP 8040, 8045 MFC 8440, 8640, 8840, 8840 is relatively easy to handle. HP is still the easiest, but Brother has gone a long way from where they were. Hopefully, the troubleshooting tips and fuser replacement instructions have helped you resolve some of your issues with this machine and get it back up in running the way it should.
Price: $744.44
7 used & new available from $744.44
Price: $529.99
17 used & new available from $399.00
Price: $439.98
39 used & new available from $299.99
Find additional printer service tips, manuals, and parts diagrams at: http://www.lbrty.com/resources.html/


