Loud Grinding Noise – HP Laserjet 4200, 4240, 4250, 4300, 4350 Printer
By far the most common problem found in the HP laserjet 4200 and 4300 series printers is the loud grinding noise generated in the back of the machine. Several things can cause the loud grinding noise so there are a few parts that need to be looked over. The good news is all the parts are located in about the same area. The bad news is one of the parts is very hard to get to and for someone not use to servicing office equipment this repair can be overwhelming. With that being said, in this article I will talk about the several parts of the printer that can cause the loud grinding noise and how to go about repairing them if needed.
What Causes Loud Grinding Noise in the HP Laserjet 4200, 4240, 4250, 4300, 4350 Printer
Fast speeds, plastic gears, and parts that take a lot of force to rotate don’t work well together resulting in extreme gear wear and a loud grinding noise in the back of the HP 4200 and 4300 series printers.. As the fuser ages it typically rotates harder, especially in the 4250, 4350, and 4240 series. When the swing plate gear starts up it hits the pressure roller gear and starts rotating the fuser. Overtime like any plastic it wears down. Slowly but eventually. Also gear dust and grease gets in the teeth causing the gears to space different resulting in the gear teeth hitting further up on each other. One thing HP has done is to add a black or white spacer that some early models didn’t have. This keeps the gear snug on the shaft and prevents slipping and less movement. Mainly though, I think a lot of it has to do with the basic fact that the fuser moves harder as the machine ages, more so on the higher speed models. Sometimes I have to replace them on the 4200 series but majority of the ones I replace are on the 4250 series. Some machines I’ve done 3 or 4 times, others I’ve never done, and some I’ve done once and never had a loud grinding noise again.
Parts that cause Loud Grinding Noise in the HP Laserjet 4200, 4240, 4250, 4300, 4350 Printers
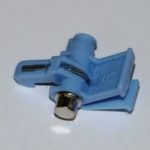
1. Right Fuser latch – Lever, clip, whatever you want to call it. Anyway, when you have the rear door removed if you’re looking at the fuser from the back of the machine it’s actually on the left side. (2 Blue clip that secure the fuser in place on the side with the gears) The original lock levers were made out of just plastic. Over time, because of the heat and the pressure generated by the swing plate gear pushing against the pressure roller gear the clip in back would crack right where it bends up. I believe the original all plastic clip was only found in the 4200 and 4300. The part was updated and a metal plate was inserted in the middle of the clip to reinforce it. Easy to see if you remove the fuser or another way to test it is to open the back door. When the back door is open the bottom part of it presses on the fuser and the loud grinding noise will go away. I rarely see the old style clips any more. All the rebuilt fusers I’ve seen have the updated parts.
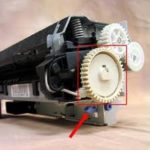
2. Fuser pressure roller gear . Remove the fuser and the large light tan gear is easily seen. It drives all parts of the fusing assembly. Pretty obvious when the gear is shot because several of the teeth will be broke and all will show some signs of wear. When the teeth break or get really worn they start grinding on the swing plate black gear. I recommend replacing the pressure roller and black swing plate together if I’m not replacing the fuser.
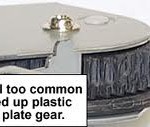
3. Swing plate black gear. If you remove the fusing assembly on the left side as you’re looking from the back is the rear black swing plate gear. This gear meshes with the fuser pressure roller that I talked about in 2. This is the most common failure in the machine that causes the loud grinding noise in the back of the HP laserjet 4200 and 4300 series printers. Usually pretty easy to see but you might need a flashlight. Again, like the pressure roller gear the teeth wear away and typically break off in spots or the pressure roller gear starts slipping over the teeth that are extremely worn. I always check out this gear when I’m installing a new fuser or doing a PM. If it looks worn even slightly I always replace it.
4. Whole swing plate assembly. Majority of the time I see the whole swing plate needing replaced is on machines that have reached the half million mark or higher. Most of the time replacing the black swing plate and pressure roller gear fixes your loud grinding noise problems. I always check out the white gear behind the black swing plate gear when I’m replacing it. Depending how it looks I will just install the black gear or tell the customer I would recommend replacing the whole assembly to prevent more loud grinding noise in the near future.
Alright, I will give the instructions for the fuser removal and black swing plate gear instructions for more info on replacing the whole swing plate assembly find a service manual or I might add it later.
HP Laserjet 4200, 4240, 4250, 4300, 4350 Fuser Removal
Note: Unplug power and communication cables and allow at least 10 minutes for cool down before fuser removal.
1. Open the rear output bin. Use your finger to squeeze the hinge pin (formatter side) out of its mounting hole.
2. Rotate the output bin away from the printer until the right hinge pin is released, and then remove the output bin.
3. Squeeze the blue fuser release tabs
4. Pull the fuser straight back and out of the printer.
Remove Formatter Cover and Formatter.
1. On the right rear of the printer is the formatter cover. Push the cover back and pull away from the machine.
2. Looking at the back of the machine you will see two screws securing the formatter. Remove the two screws and pull the formatter back and away from the printer.
Black Swing Plate Gear Removal
1. Behind where the formatter sat you will see a small back screw that secures the swing plate shaft. While holding the shaft on the opposite side of the swing plate assembly remove the screw. After the screw is removed I usually take a canned air straw and stick it through the whole and push the shaft out the other side. Otherwise it can fall down inside the power supply. Trust Me. Once the shaft is out, next, pull out the spacer then the gear. There is a plastic clip inside the swing plate. If you try to pull the gear out first it will hang on the clip and make it very hard to get out. Removing the spacer first allows you to shift the gear right and around the clip. I always check the white gear behind it for wear and the shaft for wear. I’ve seen the shaft get worn down on one side and cause the loud grinding noise. Install the new gear and spacer. I usually use a caned air straw and guide it through the gear and spacer wholes to keep them in place. Once everything is in a put the swing plate shaft back on the straw and feed it through the gear and spacer. Screw it back in and reinstall the fuser, formatter, back door, and formatter cover.
Conclusion about the Loud Grinding Noise
That’s it. Hopefully this helped you figure out your loud grinding noise in your HP laserjet 4200 and 4300 series printers. A lot of things can cause this issue. I always replace the black swing plate gear and pressure roller gear at the same time if not replacing the fuser. If the fuser shows signs of wear, has never been replaced, or seems to turn really hard then I would also replace the fuser. If not you might be replacing the sing plate gear again in another 50 to 60,ooo copies.
Additional Printer Repair Articles can be found at : http://www.metrofuser.com/


