Samsung SCX-5739FW Fuser Replacement Details
Samsung SCX-5739FW Fuser Replacement Details – Directly below you will acquire the illustrated fuser replacement guide. These fusers are rated at more or less 90,000 pages. Ordinary evidence of worn fusers are creases or indents on the pages, open, low, or high heat errors, and a range of print quality issues. These fusers are fairly simple to extract so it won’t hurt to take a couple of minutes to take it out and go over it if you are witnessing troubles you may perhaps think are connected to it.

Samsung SCX-5739FW Fuser Replacement Details
1. Remove the duplex unit if the machine has one.
2. Open the rear cover and then remove it by releasing both hooks.
The temperature gets high in the vicinity of the fuser unit. When replacing it, you may get burned. Before replacing it, make sure that fuser unit has cooled.
3. Open the Frame-Rear by pushing both green points.
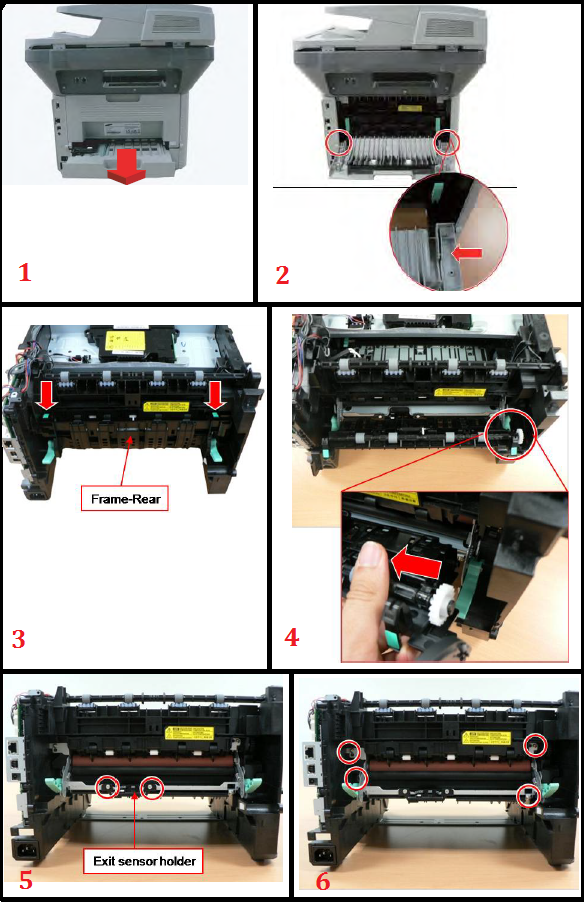
4. Remove the Frame-Rear by releasing both hooks.
5. Remove the exit sensor holder after removing 2 screws.
6. Remove 4 screws.
7. Release the fuser unit.
CAUTION
When reassembling the fuser unit, do not forget to tighten these screws.

JC91-01023A Samsung ML-3312 OEM Fuser (GENUINE Samsung OEM)
M3370 fuser replacement 1of2
M3370 fuser replacement 1of2.
M3370 fuser replacement 2 of 2
M3370 fuser replacement 2 of 2.

