Canon imageCLASS D1120, D1150, D1170, D1180 Fuser Removal Procedure
I always like working on these machines. This is a surprising well built machine for the price and size. I’ve seen these machines put up some pretty impressive page counts with very little maintenance. So while the Canon D1120, D1150, D1170, D1180 Fuser Removal in these machines can be more difficult than other models I think it is worth. Anymore you never know what kind of machine your going to get with the newer models so when I find one that works good I like to keep it going.
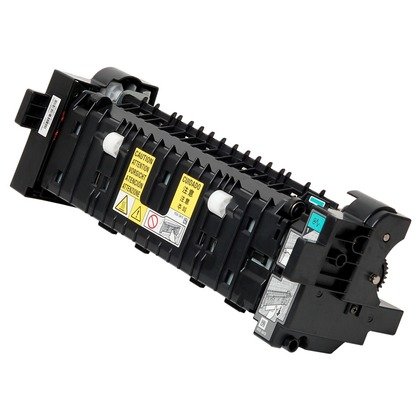
Canon imageCLASS D1120, D1150, D1170, D1180 Fuser

Canon D1120, D1150, D1170, D1180 Fuser Removal Instructions
Left Cover Removal
1) Remove the cassette.
2) Press the Open button, and open the Cartridge Door Unit.
3) Open the ADF Unit + Reader Unit.
4) Release the claw, and remove the Arm Cover.

5) Release the Connection of Arm and turn it toward the rear
6) Place the host machine while shifting the left side of it approx. 10cm from the working table.
7) Open the ADF Unit + Reader Unit, and release the claw.

8) Open the ADF Unit + Reader Unit, and release the claw while pulling the Left Cover in the direction of the arrow
MEMO :
Be sure to release it while releasing the edge area of the Left Cover from 4 Hooks of the Upper Cover and Front Cover.
9) While opening the Left Cover in the direction of the arrow, release the 2 Claws at lower side.

10) Open the ADF Unit + Reader Unit, and release the claw.
MEMO :
Be sure to release the claw while holding the Left Cover.
11) Open the ADF Unit + Reader Unit, and remove the boss from the Left Cover.

12) Remove the Left Cover.
MEMO :
At installation, be sure to fit the Left Cover to the 5 Protrusions of the Left Rear Cover.
13) After removing the Left Cover, place the host machine in the center of working table.
Left Rear Cover Removal
1) Removing the Left Cover.
1) Open the ADF Unit + Reader Unit, and release the 2 Claws.
2) While lifting left side of the host machine, remove the Left Rear Cover.

Right Cover Removal
1) Place the host machine while shifting the right side of it approx. 10cm from the working table.
2) Open the ADF Unit + Reader Unit, and release the 2 Claws while pulling the Right Cover in the direction of the arrow.

MEMO :
Be sure to release it while releasing the edge area of the Right Cover from 4 Hooks of the Rear Cover.
3) Close the ADF Unit + Reader Unit, and release the 2 Claws at lower side while pulling the Right Cover in the direction of the arrow.

4) Open the ADF Unit + Reader Unit, and release the claw while pulling the Right Cover in the direction of the arrow.

5) Remove the Right Cover.
MEMO :
At installation, be sure to fit the Right Cover to the 4 Protrusions at front side of the host machine.
6) After removing the Right Cover, place the host machine in the center of working table.
Rear cover Removal
1) Push the Grip Downward and Open the Duplex Feed Unit.
2) Remove the Rear Cover Unit.

3) Remove the Duplex Feed Unit from the Rear Cover Unit.
CAUTION :
Procedure at installation
1) Fit the 2 Upper Claw of the Rear Cover Unit [1] With the Upper Cover Unit.
2) Open the Sub Output Tray and While Pushing the Duplex Reverse Sensor Flag
Downward, Install the Rear Cover Unit.

3) Check That the Sensor Flag Protrudes Through the Hole of the Guide Unit On
the Back of the Duplex Unit Cover.
CAUTION:
When Removing the Fixing Unit, Perform the Operation After the Fixing Unit is Surely Cooled.
The Fixing Unit Just After Printing May Cause Burn Injury.
Canon D1120, D1150, D1170, D1180 Fuser Removal
1)Close the Front Cover and Move the Gear In the Position Where It Can Be Removed.
2) Remove the 3 Gears.

CAUTION:
Points to Note at Installation
Fit the Protrusion of the Gear (21T) With the Cut-off of the Gear and Install it.
Fit the Cut-off of the Gear (21T) With the Teeth of the Fan Gear and Install it.

3) Remove the Duplex Feed Sensor Unit.
4) Remove the Harness from the 2 Harness Guide.

5) Remove the Feed Guide.
6)Remove the Fixing Unit.

CAUTION:
Do Not Disassemble the Fixing Unit at a Field.
It May Cause a Malfunction.
[wwcAmzAffProducts asin=”B009UOJ2QA”][/wwcAmzAffProducts]