Instructions for the Kyocera FS2000, FS3900, FS4000 Fuser Replacement
Now I’ve seen these fusers as being rated at 100,000 prints. I think they might be able to get more out of them. The Install MK message appears at 300,000 and the fusing assembly is part of the 300,000 maintenance kit. I’d probably try to push it to 150,000 between fuser replacements. I personally think trying to make it last 300,000 prints isn’t going to work out very good. I don’t really have a whole lot to say about these fusers. The main problem I’ve seen with them is pick finger problems where the pick fingers scratch into the surface of the hot roller and then leave impressions or grey lines vertically down the page. The pressure rollers have had a few issues where they develop flat spots or get ripples on them which can lead to jamming. This problem is easily discovered by removing the fusing unit and taking a look at the two main rollers in the unit.


Note : The removal procedure for these machines is the same but the fusing assemblies are different. The FS2000 takes the FK-310 fusing assembly while the FS3900 and FS4000 machines take the FK-320 fusing assembly.
Kyocera FS2000, FS3900, FS4000 Fuser Replacement Procedure
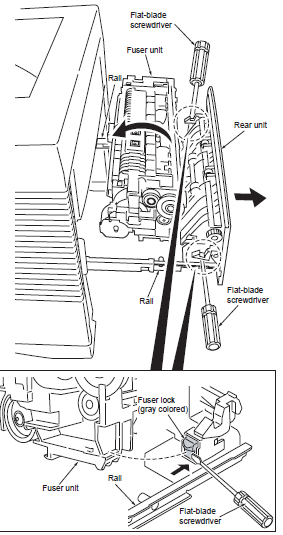
1. Open the rear unit.
2. Insert a flat-blade screwdriver to push the fuser lock (gray colored) on the rear unit and the fuser unit is separated from the rear unit (rails).
Do it both ends of the rear unit.
3. Check or replace the fuser unit and refit all the removed parts.
Place the fuser unit on the rear unit (rails) and push the fuser lock so that the fuser lock catches the fuser unit.
Do it for the both ends of the fuser unit.

