Illustrated Instructions for the Dell 5330dn Fuser Replacement and Reset Procedure
The fusing assembly in these machines are rated at around 150,000 prints. In most cases they probably can make it longer than that. Dell machines tend to hold up pretty good. Below you will find the instructions on the Dell 5330dn Fuser Replacement Procedure. There really isn’t a lot I’m going to talk about in this article. Look for other articles for more specific information on error codes associated with the fusing unit. The machine does have a fuser life counter so at the end of the article you will find the instructions to reset the counter if you find the need to replace the fusing assembly.
–
–
While these units do have life spans they might not always reach the recommended 150,000 prints before problems arise. Below you will find a list of the fuser errors along with some print quality issues that may happen. Warped or flat spotted pressure rollers can lead to paper jams and other things can happen to the rollers to create different print quality issues. If you have replaced the toner for print quality problems and it didn’t fix the problem than the fuser is always something that should be pulled out and taken a look at.
Fuser Error Codes
Open Heat Error – Low Heat Error – Over Heat Error – Fuser Error
Print Quality Defects
Heat Roller – 125.6 mm – Black Spots or Vertical Black Band
Pressure – Roller 125.6 mm – Background
Fuser Part Numbers :
- Dell 311-9572
- FM055
- HW679
Dell 5330dn Fuser Replacement
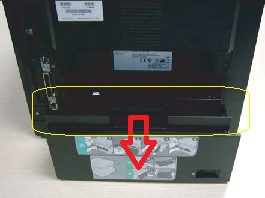
1. Remove the Duplex Unit – On a lot of these machines the back of the duplex unit will prevent the rear door from opening all the way making it hard to remove the door so while you think you might just leave it in, you end up taking it out. It just pulls out the back of the machine.
2. Remove the rear door safety strap. On most these straps you just pull the top of the strap up and inside the machine and twist it then pull it out the holder
3. Once the strap is free then lay the door down and lift the inner right side out of the post holder the slide the door left and out of the the left side post holder.

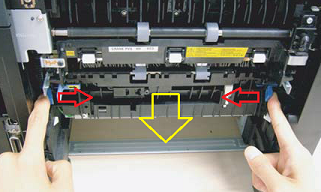
4. Push the blue plastic retention clips towards the center of the fusing assembly to unlock it.
Note : On some machines you might find two screws on the bottom of the fusing assembly that need to be replaced. The original service manual doesn’t show this but I have seen other articles reference these screws. What I’ve found on these Xerox, Dell, and Samsung engines is that the manuals don’t always match the machines exactly.
To reset the life counter:
- Enter the printer’s Tech Mode by quickly pressing the sequence of keys Press Menu -> Up -> Left -> Ok -> Right ->Cancel ->Menu. If Tech Mode doesn’t appear, press the key sequence again as quickly as possible. A delay in pressing the keys will stop the menu from opening.
- Select Tech Menu > Data Setup > Clear Fuser Count.
- Restart the printer.