MFC 8510, 8710, 8910, 8950 – Brother Fuser Replacement Instructions

Brother Fuser Replacement Instructions – MFC – 8510, 8710, 8910, 8950
One of the nice things I always liked about Brother machines was the fact they still used Hot Rollers in their Fusing Assemblies. Times change, and so have the Brother Fusers. Like HP, Brother is now using heating elements covered by a fixing film. While these new designs should help envelope feeding and quicker warm up times they do come with some additional print quality and feed issues. In other articles I’ll tackle those issues. This article is strictly to provide the Brother Fuser Replacement Instructions for these models of machines.

Brother Fuser Replacement Instructions
1. Open the Back Cover
2. Seperate the Back Cover from the outer chute. The service manual doesn’t mention it I’ve found the best way to remove it is one side at a time. Trying to do both at the same time might end up and breaking the ribs.
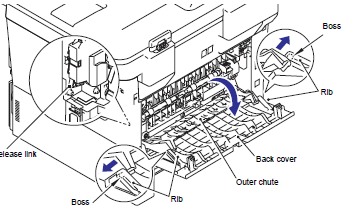
3. Remove Back Cover
4. Remove the outer chute from both post. The outer chute needs to be at around a 80 decree angle for removal as the post as to match the opening of the outer chute hinge. See area circled in picture below.

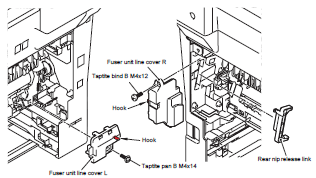
5. Push the the two knobs on the fuser cover and pull the cover down.
6. Remove the fuser cover from the post and pull away from the machine.

7. Remove the two screws holding in the R and L Fuser Line Covers and remove from machine.
8. For easier removal Open the machines front cover then remove the Rear Nip Release Link.
9. Disconnect the heating element harness from the low voltage power supply.
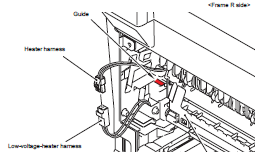
10. Remove the Ground spring. I always forget how this comes out so if you don’t plan on taking these instructions with make a note of how it comes out.
11. Remove the center and side thermistor harness from the eject sensor PCB. Again, I always forget about these because they aren’t in clear view. Be careful when removing as the connectors can be fragile in this area.

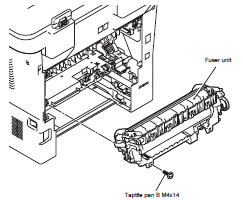
12. Remove the final screw and remove the fusing unit from the back of the machine.
Click on the link below for buying options and additional details
Brother 8810dw replacing the fuser
Could be similar to 8710dw and 8910dw.


This process outline is excellent. I swapped the fuser in our 8710 in about 15 minutes.
pl help i have new fuser unit
Excellent instructions – simple process, well laid out. MFC-8950DW. Thanks for putting this out there.
Great instructions. Thank you.
Mahalo for easy instructions! I was able to fix in just a few minutes! Aloha, Lisa
Maui, HI
Replaced the fuser and now get the 6a errors which I cannot reset with a manual hard reset. Any ideas on what could have gone wrong?
I replaced my fuser, afterward, nothing but FUSER ERROR and PRINT UNABLE DE messages. reset everything. prints 3 pages single-sided and then I get FUSER ERROR.
Unfortunately, SAVE the MONEY of a FUSER and Buy a different printer,