Troubleshooting the U4-1 High Fuser Temp Error on the Xerox Phaser 4510 Machine
The service manual explanation goes on and on and has you check voltages and connectors. In reality the U4-1 High Fuser Temp error is a lot simpler than the service manual describes it. It’s extremely rare that you have to go beyond replacing the fusing assembly to fix your problem. In this article I’d just like to give a few simple tips to try before you break down and replace the fusing assembly.
Troubleshooting Tips
1. Turn the machine off let it sit 20 to 30 minutes to let it cool off then try again.
2. Check in make sure the machine has plenty of ventilation. I typically recommend 6 inches on all sides of the unit and remove any labels, pictures, or paper people sometimes stick to the sides of the machine.
3. Environmental Conditions – I don’t recommend using any laser printer if the temperature is above 85. In hot summer days outside temps in factories can get over 100 and I’ve seen high temperature errors result.
4. Running large print jobs using heavy cardstock can cause this error as the fuser temperature has to run at its max temperature to run heavy cardstock.
5. If the problem continues replace the fusing assembly.
Xerox Phaser 4510 Maintenance Kit – 108R00717 Fuser Replacement Instructions
Warning : The fuser assembly is very hot immediately after the printer is turned off.
To avoid possible burns, wait to remove the fuser until it cools down
sufficiently to be handled.
 –
–
–
–
–
–
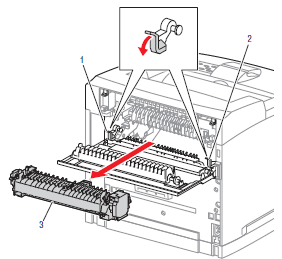
1. Open the paper exit rear door.
2. Push down the left and right fuser levers in the direction of the arrow to
release the fuser assembly locks.
3. Pull the fuser assembly out the back of the printer as indicated by the
arrow.


