Fuser Removal Procedure and Troubleshooting Tips for the Dell 1815dn Printer
The Dell 1815/1815DN Printer Fusing Assembly, UG297 , is rated at approximately 80,000 prints. Unfortunately, the machine doesn’t have maintainance life counters on them to tell you when the fusing assembly is worn out. About the only time you will know when it’s time to replace the fusing unit is either through a technician servicing the machine or other issues caused by the unit starting to fail. I know I’ve been very impressed on how long these fusers seem to last. As I read the service manual to prepare for this article I was surprised to find it rated only at 80,000 prints, I was sure it was around 100,000 to 150,000. In this article, I’d like to talk about a few of those situations that happen when the fusing assembly starts to fail and how to go about the fuser removal to inspect and replace the fuser if needed.
In the reports menu print off the configuration page to show you the number of prints the machine has on it.

Signs to Replace the Fusing Assembly
1. Abnormal noise and extreme cases grinding and jamming. If the fuser is left in the printer for an extended amount of time after the 80,000 prints the gears start to wear down. Typically pretty easy to notice when you take the fusing assembly out because there will be lots of light brown gear dust on the left side of the unit. The bad thing here is that when the fusing unit gear breaks down it starts eating away at the fuser drive gears in the machine. This is one of the main reasons these fusing units should be replaced once they hit their life counter.
2. Smudging, ghost print, and other image defects. Anytime you have an image defect the first thing to replace is the toner. If that fails to fix the problem then it’s time to check the fusing assembly. Most times in this machine I see the pick finger eat into the hot rollers outer coating. Once this coating has been removed you will get vertical lines and smudging down the page. Pretty easy to see just by opening the back access door on the fuser like your going to remove a paper jam.
3. Warped or wrinkled pressure roller. Again easy to see if open up the back of the unit. If the pressure roller gets wrinkles in it then it can cause jamming, poor fusing, and abnormal noise.
Rear Cover Assembly
1. Open the DIMM Cover from the Left Side Cover in the direction of arrow, as shown below.
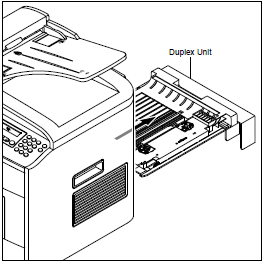
2. Take out the Duplex Unit.
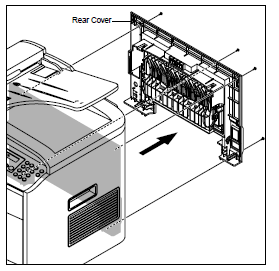
3. Remove the four screws securing the Rear Cover and then Release the Rear Cover from the Set.
 –
–
–
–
–
–
–
–
Dell 1815/1815DN Printer Fusing Assembly, UG297 Removal Procedure
1. Before you remove the Fuser Assembly, you should remove:- Rear Cover
2. Remove the four screws securing the Fuser Assembly and then pull the Fuser Assembly out the back of the machine.
 –
–
–
–
–
–
–
–
Click on the link below for additional details, information and pricing options.
Dell 1815/1815DN Printer Fusing Assembly, UG297