Diagnostic Aids For the Install or Reseat Fuser on the Xerox Phaser 6300, 6350, and 6360
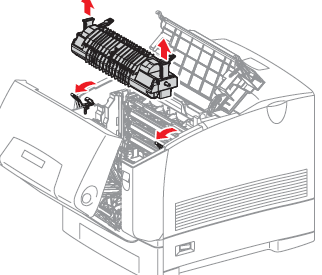
The Install or Reseat Fuser Message means that the machine cannot read the fusing assembly, Xerox Phaser 6300, 6350, and 6360 FUSER – 115R00035. Remove the fusing assembly and check the connectors. Check out the service manual instructions listed below for further troubleshooting tips. One thing that I always check in errors like this is the thermostat. Pull out the fuser and check continuity across the thermostat fuse. If you don’t find continuity then the fuse has opened and not closed properly when cooled. A lot of times to reset the fuse it needs a shot of cold air. Remove the fuse, hold a can of air upside down and give it a blast of extremely cold air. Most times if the thermostat fuse can be reset this will do the trick. Check the continuity again. If it passes then reinstall in the fusing assembly and retest the fuser.
Code 214: Install or Reseat Fuser
Troubleshooting Steps From the Service Manual
1. Cycle power to the printer.
2. Check the Fuser for damage. Is the Fuser damaged?
Yes – Replace the Fuser
3. Check Fuser resistance.
1. Remove the Fuser.
2. Disconnect J361.
3. Is the resistance between P361-B5 <=> P361-B4 less than 400KΩ?
4. Is the resistance between P361-B5 <=> P361-B4 less than 7MΩ?
No – Replace the Fuser
4. Check all pins on the FSR/ADC Harness PL5.2.28 for continuity.
1. Disconnect P/J36 and J361.
2. Check continuity between J36 <=> J361.
Yes – Replace the Engine Control Board
No – Replace the FSR/ADC Harness
–
–
–
–
–
–
–
For pricing and other details click on the link below for more information.
Xerox Phaser 6300, 6350, and 6360 FUSER – 115R00035


