Error code 52 – Change PF Kit 1 – Brother 9040 and 9440
User Check
– Replace the T1 paper feeding kit with a new one. (PF Kit 1)
– After replacing the T1 paper feeding kit, reset the counter using the control panel on the machine.
At 100,000 prints or copies the PF Kit 1 replacement message will come up. On some Brother machines the roller still don’t look that bad but for some reason on these machines they always look bad at this point. Majority of the time if a customer calls me out for the fuser message at 80,000 prints I usually just replace these parts at this time and reset the counter with the fuser.
Brother LR1919001 Paper Feed Kit MFC 9440CN 9840CDW HL-4040CN DCP-9040CN
[contentblock id=2]
Paper feed Roller Removal Procedure
1. Press the Front cover release button, and open the Front door unit ASSY.
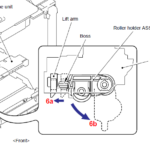
2. Push the Lift arm to the direction of the arrow 6a and release the boss of the Roller holder ASSY. Then, turn the Roller holder ASSY to the direction of the arrow 6b.
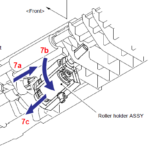
3. Slide the Roller holder ASSY to the direction of the arrows 7a, 7b and 7c in this order and remove it.
4. Assemble the Roller holder ASSY onto the Paper feed frame unit in the order of the arrow 1a, 1b and 1c.
* Align the holder shaft of the Roller holder ASSY with the shape of the hole on the Paper feed frame unit and put the shaft into the hole.
5. Turn the Roller holder ASSY to the direction of the arrow 2a, push the Lift arm to the direction of the arrow 2b and fix the Boss of the Roller holder ASSY into the hole of the Lift arm.
Note : Check whether the Lift arm moves by pushing the Roller holder ASSY upwards. If the Lift arm does not move, it is not assembled correctly.
6. Close the Front door unit ASSY.
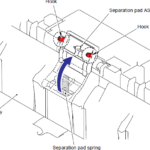
Separation pad ASSY Separation pad spring Positioning section
7. Assemble the Separation pad spring. Put the positioning section of the Separation pad ASSY into the spring and catch the two Hooks.
8. Push both sides of the Separation pad ASSY inwards and put its Pins into the Paper tray.
Note: Check that the Separation pad ASSY pivots up and down smoothly by pushing it gently.
9. Install the Paper tray into the machine.
10. After replacing the Paper feeding kit, reset the counter.
Reset Parts Life Counter For the PF KIT 1 Message
When the machine is at a ready state press the 3 and 9 buttons at the same time. The machine should then read Reset Menu. Scroll through the menu till you see PF KIT 1 on the display then press OK. The display will then read 1. Reset and 2. Exit. Press what you want the machine to do then the machine should go to a ready state and the Replace PF kit 1 message should be gone if you pressed 1 for reset.
[contentblock id=1]
For More information involving Printer Repair take a look at this site: http://www.fixyourownprinter.com/
For More information involving Printer Repair and some articles I have written check out: http://blog.marketpoint.com/

