51.10 Error- HP Laserjet P3015 Printer Laser Scanner Error
I ran into a HP laserjet P3015 printer with an 51.10 error on the display the other day. I decided after replacing the laser scanner assembly, HP LaserJet Enterprise P3015 Series Laser/Scanner Assembly, LJ P3015/M525mfp RM1-6322-000 to do some research on the internet to see if others were having the same problem. I was surprised to find out that several other people had complained of the same problem. Hewlett Packard, in the last few years has been known to cut corners and not do enough research before entering products into the market place. Hopefully, this problem on the P3015 is a few isolated instances and will not be an ongoing issue. In this article I’d like to talk a little bit about the 51.10 error in the HP P3015 printer and how to go about replacing the laser scanner unit if you have to.
Troubleshooting the 51.10 error in the HP Laserjet P3015 Printer
Really, troubleshooting the 51.10 error in the HP laserjet P3015 printer shouldn’t be too difficult. The one I ran into it was right on the display and the machine wouldn’t do anything. If your customer complains of the 51.10 error and you can’t duplicate the problem then print of the error report in the diagnostic menu or in the same menu go to the component test and run the laser scanner motor test to see if the problem shows up again or if the laser scanner motor is sounding louder than normal.


Last updated on April 17, 2024 6:19 am
Service Manual suggested Troubleshooting steps for the 51.10 Error in the HP laserjet P3015 Printer
1. From the DIAGNOSTICS menu, run the laser/scanner motor component test. Verify that you can hear the motor rotate.
2. If you cannot hear the motor rotate, verify that connector J1702 and connector J1505 are fully seated on the DC controller PCA (ECU).
3. Verify that the connector J100 on the laser/scanner assembly is securely attached.
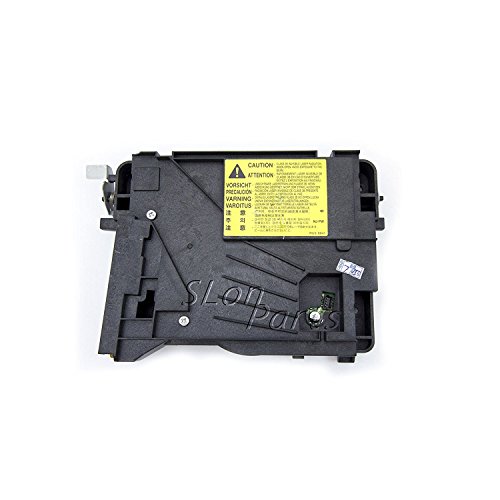
4. If the error persists, replace the laser/scanner assembly, HP LaserJet Enterprise P3015 Series Laser/Scanner Assembly, LJ P3015/M525mfp RM1-6322-000
Removal Instructions for the laser scanner unit in the HP Laserjet P3015 with a 51.10 Error
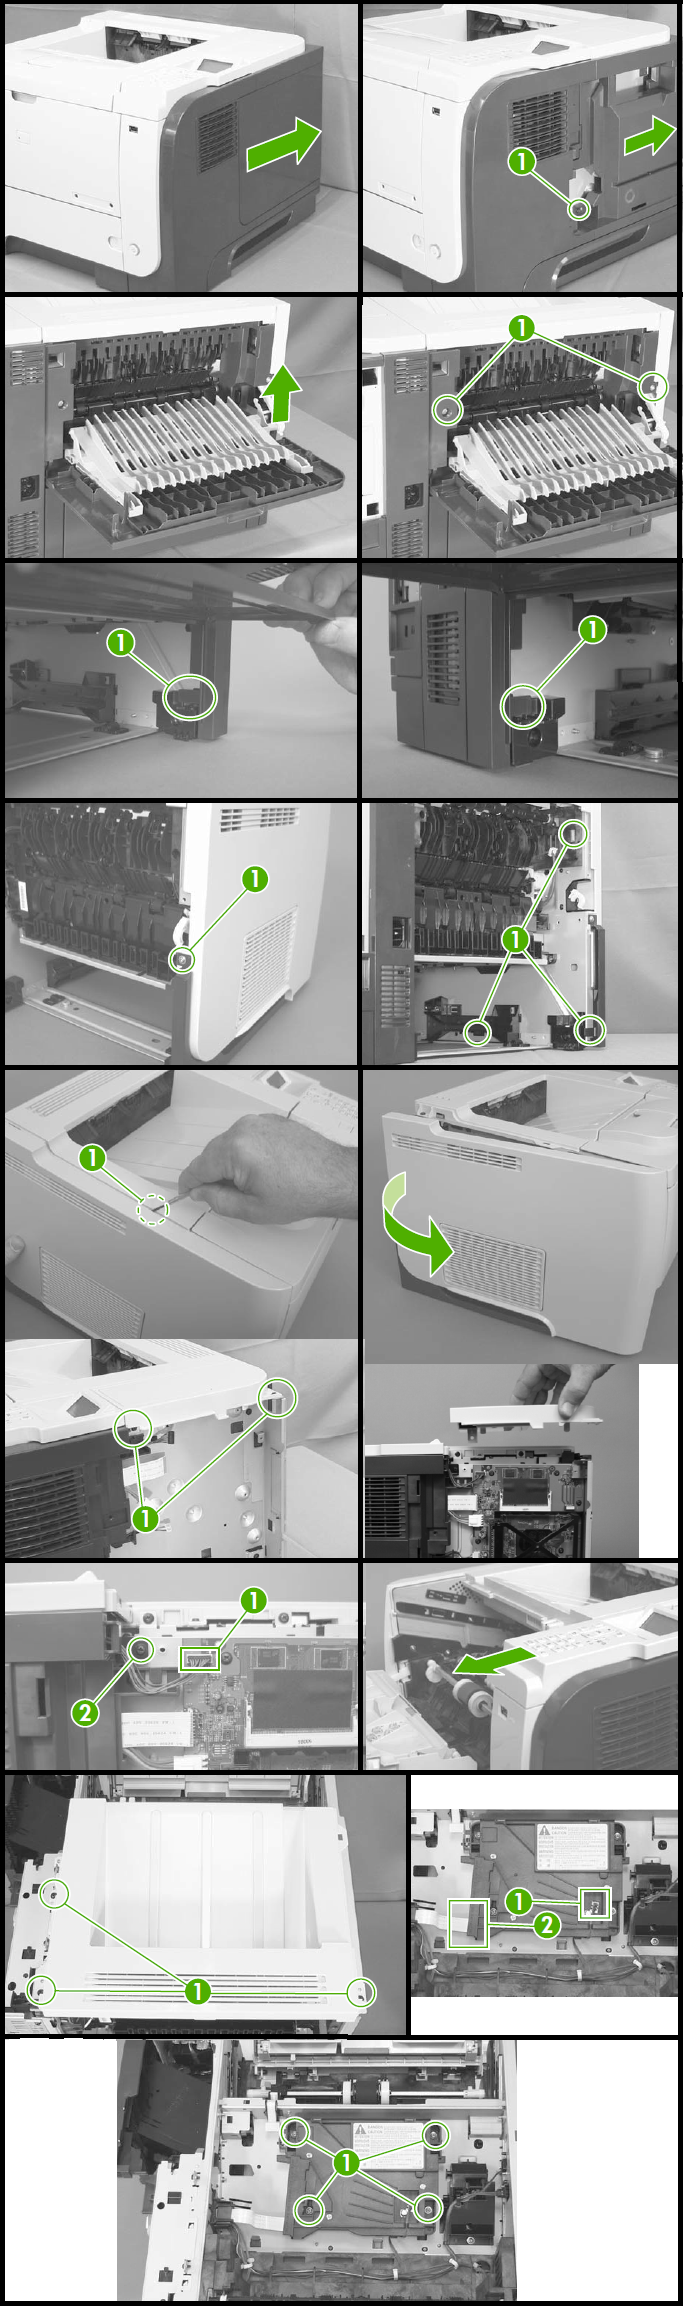
DIMM Cover Removal
1. Slide the DIMM cover toward the back of the product to release it.
2. Lift the cover away from the product.
Formatter cover
1. Remove one screw, and then slide the formatter cover toward the back of the product to release it.
2. Lift the cover away from the product.
Rear-door assembly
1. Open the rear door.
2. Gently pull down on the door and lower the door until it is fully open.
3. Push up on the link arm to release it.
CAUTION: The link arm is under spring tension. Do not let the link arm snap back toward the product when you release it.
4. Remove two screws.
5. Open the lower-rear door, and then release one tab.
6. Release one tab.
7. Rotate the bottom of the rear-door assembly away from the product.
8. Pull down on the rear-door assembly to remove it.
Left cover
1. Remove one screw.
2. Release three tabs.
TIP: The tab inside the cassette cavity is located below the plastic cassette rail. It might be easier if slightly lift up the left side of the product, and use a small flat blade screwdriver to release this tab.
3. Release one tab.
4. Rotate the rear of the cover slightly away from the product, and then slide the cover toward the front of the product to remove it.
Top-right cover
1. Remove 3 screws.
2. Lift the cover off of the product to remove it.
Control panel
1. Press the cartridge-door release button, and then open the cartridge door. Make sure that the door is completely open.
2. Disconnect one connector, and then remove one screw.
3. Slide the control panel toward the front of the product to release it.
4. Lift the control panel off of the product.
Top cover
1. Remove three screws.
2. Slightly raise the rear of the cover, slide the cover toward the front of the product, and then remove it.
Laser Scanner Removal
1. Release one tab on the air duct, and then lift the air duct out of the product.
2. Remove the antistatic sponge.
3. Disconnect one connector and one FFC.
Reinstallation tip Make sure that you correctly reconnect the FFC when the laser/scanner is installed. If the FFC is not correctly reconnected, a 51.1 ERROR will appear on the control-panel display.
4. Remove four screws.
5. Lift the laser/scanner up and out of the product.
HP LaserJet Enterprise P3015 Series Laser/Scanner Assembly, LJ P3015/M525mfp RM1-6322-000
Conclusion about the 51.10 error in the HP laserjet P3015 Printer
Hopefully the 51.10 error in these printers will not be a problem that happens a lot in the machine. HP laser scanner units have always been durable and reliable. I just worked on two other HP P3015 printers. One had 150,000 and the other had 200,000 prints with both being around 1-year-old and the fuser units still looked great. So Hewlett Packard seems to have worked the bugs out in that area compared to the P3005 model. From what I’ve seen with this model it’s still not a P4015 but it’s a lot better than the P3005 nightmare that it replaced.
Last updated on April 17, 2024 6:19 am
Find well displayed printer parts diagrams at: http://www.printerworks.com/


Thank you. This was extremely helpful. 98 % of our machines are Lexmark I will be referring to this place when I can. If I use it enough I will definitely donate.
Thanks again.