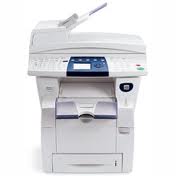
Xerox Phaser 8560, Workcentre C2424 Blue Haze Background
The Xerox Phaser 8560 and Workcentre C2424 machines have very sensitive scan units. Just a little bit of color in the background of an image is picked up and intensified on your copies. I believe another aspect of the blue haze background problem is the fact that after a few years the optics inside the copy unit get a build up of dust on the internal scanner mirrors, Unlike most other copiers the internal scanner optics of the the Phaser 8560 MFP and Workcentre C2424 are about impossible to get to and even harder to clean. Trust me I’ve taken a few of these apart in a desperate last attempt to make them work right again. Each time it was worse than when I started. Right now, no internal parts of the scan unit are orderable because Xerox doesn’t even make the scan unit. The only way to correct most scan unit problems on these models is to replace the whole unit, which runs around $800 to $1200. One reason why it’s become more difficult to find a repair or service company willing to look at these machines. In this article I would like to discuss the blue haze background defect that is becoming more prevalent in these models.
Troubleshooting Blue Haze Background on a Xerox Phaser 8560 MFP or Workcentre C2424
1. Verify that the DADF, Duplex Automatic Document Feeder, is all the way closed when copying from the glass. The  white pad on the bottom of the DADF prevents any background color from being picked up by the scanner. Having the glass raised just a little and typically you will see some blue haze background color in that area.
2. Enable Auto Suppression- Press the (Copy) button, then scroll up and down to (Auto Suppression), press the (Copy) button again, then scroll up or down till you see (ON) then press the (OK) button. Suppression is typically used to minimize the scan intensity for thin or paper that has text or images on the opposite side but can help with the blue haze background.
3. The fix, I found, that works best with the elminating blue haze background is reducing the brightness of the paper. Most paper is between 80 to 96 brightness. The brightness is usually found on the package for the ream of paper next to the paper weight. The brighter the paper the more blue haze background for some reason. If you are experiencing this problem then the first thing I would try is finding a paper around the office with a lower brightness and try that first. I think you will be surprised how much it helps. A lot of customers anymore just by the cheapest paper they can find so there paper brightness might change from time to time due to when they buy their paper. So don’t always assume it’s the paper you or your customer has always used because in a lot of cases it’s not.
4. Adjusting the Document Type is my second recommendation. The Document Type feature is on the control panel. Text is the one you want. If you’re looking at the control panel it will be the one furthest down with a picture of just plain text next to it. Plain text uses the machines lowest scan resolution and intensity so it doesn’t pick up background. The only downfall is that default is mixed so after a period of inactivity it reverts back to mixed so you have to change it just about every time you make a copy.Possibly changing color to black and white on the control would further help.
5. Another option is to change the contrast. Contrast can be found by pressing the copy button and scrolling up or down till you find the contrast menu. It’s recommended you turn it down -2 to -3. Once again lowing the intensity of the scan level, eliminating some of blue haze background. Last option to adjust is the cyan color balance. Cyan balance is found under System, Copy Default Setup, Color Balance. You will want to adjust it to -2 to -3.
Note: While changing some of the settings in step 4 and 5 might correct your issue or reduce it significantly. Most these setting will revert back to their original settings once the copier is not used for a period of time. So you end up getting stuck pressing extra buttons every time you want to make a copy and your changing your quality out put by adjusting these settings.
Conclusion On the Xerox Phaser 8560 MFP and Workcentre C2424 Blue Haze Background
Ok, I’ve listed several different ways you can try to help eliminate the blue haze background found in the Xerox Phaser 8560 MFP and Workcentre C2424. Personally I’ve found that changing the contrast, color balance, and auto suppression didn’t help a whole lot and made the rest of the image look worse. The two that worked best for me is changing the Document Type on the control panel to text, its lowest setting or changing the brightness of the paper. With changing the brightness of the paper you don’t really have to change the pattern of how you use the machine. Also it won’t affect you overall image. Yes you will notice the difference in the brightness if next to another brightness of paper but by itself no one will notice the difference unless their very observant.
For More information involving Printer Repair and some articles I have written check out: http://blog.marketpoint.com/


